Posts tagged entertaining
Layla's Frozen-inspired birthday party


 Layla turned another year older last week - SIX! The extra-long summer had us fooled it was going to be warm forever, so we were very excited about rigging up a sheet tent in the backyard, filling it with pillows and cushions and blankets and fairy lights and borrowing a friends projector for an outdoor movie night. Then winter actually made an appearance and that idea vanished as quickly as the heat. At least it would have been an appropriate movie - Frozen is THE movie of All Of Time for kids apparently. Except we'd have been frozen... So regular hours and regular party it was - maybe she can have a half-birthday celebration in summertime! A Frozen theme didn't go away though, so we decided on brunch, a few of her closest little girlfriends and some traditional party games - pass the parcel, pinata, musical statues. I also threw in a few extra bits just for fun. Here's how it went down!


I already had a bunch of tissue paper, honeycomb balls and streamers in the right colours - (I stocked up once in pinks and blues/greens and whites - they're the colours I always seem to use the most!) so all I bought for this party was the food, a packet of white balloons and a couple packets of clear hair combs from Coles.


Mini Elsa dress-ups This is why I bought clear hair combs in case you thought that was a weird thing to buy for a party. I made each of the girls Elsa crowns because WHY NOT? This was worth every second minute of the whole hour or so it took to make them - they LOVED them and it even was responsible for bribing one little partygoer out of the car and into the party (you know how kids go strangely shy when they arrive at someone's house even though they know them and want to go there!). I promise you they were easy enough to make - I used a cereal box and drew the pattern on (I just Googled Elsa crown template and copied it from that) but because the edge of the combs are curved, it wouldn't have glued to it properly, so I continued on the bottom of the template and curved it to match the curve of the comb. Then I cut them out, used a scalpel for the inside bits and then gave them a couple coats of gold spraypaint. Once dry I used some metallic blue paint on the middle parts, sprinkled on the blue glitter. Once that was dry, I ran the hot glue gun along the edge of the comb and pressed the crown onto it. Done! Elsa crowns! Each girl also had a bit of metallic teal netting stuck to their clothes as an Elsa cape - I had some left over from Layla's mermaids party last year - but they kept tripping on them and the tape didn't stick (I had no safety pins!) so they quickly got discarded. The crowns, though? Didn't move from little heads all party. 


Doily snowflake decorations I knew I'd use this DIY I created years ago for something! And this was it - these doily snowflakes made sweet decorations in the living room.


Pinata Of course there was a pinata! A snowflake one - snowflakes were the motif of this party. The invitations (which I didn't get a picture of, but were just a white circle with a blue watercolour snowflake painted on the front and the details written on the back), pinata, cake, cookies and one of the activities all featured the pretty snowflake shape. This was made from a nappy box! And some packaging tape, but I didn't tape it too crazily because every year my pinatas need at least five rounds from all the kids, plus a few extra whacks from Zak and occasionally an adult before it gets a hole in it! But it STILL HELD and needed some encouragement for the lollies to fall! Anyway, once the shape was created, I stuck on some blue tissue paper on the front and back and cut out the snowflake cuttings from white paper.


Cookie decorating! I had a Christmas cookie decorating party for the kids and their friends one year and they had so much fun, I thought the girls would like to do this too. So I made some sugar cookies using this recipe and let them at them. They were there for ages icing and carefully placing their little cachous, sprinkles, M&Ms and mashmallows on the stars, snowflakes and clouds (they were Olaf's flurries!)


Snowflake cutting Zak led the way here and showed the girls how to make them. I tried but got shooed away and told I wasn't doing it right (I was, but who am I to argue with a seven-year-old who seems to know everything?). Some of them came out quite cool.


Keychain threading I thought I'd make use of the leftover beads I had and the girls could make some keychain decorations for their schoolbags. Not quite as popular as I thought this would be, but some of them still did it! I originally wanted small quartz crystals for the ends and a few pretty beads at the top but must have imagined seeing the bag of crystals that inspired this as when I went into the store and asked for them, they looked at my blankly and told me they didn't sell what I was asking for. Not sure why I thought they had them, but anyway!


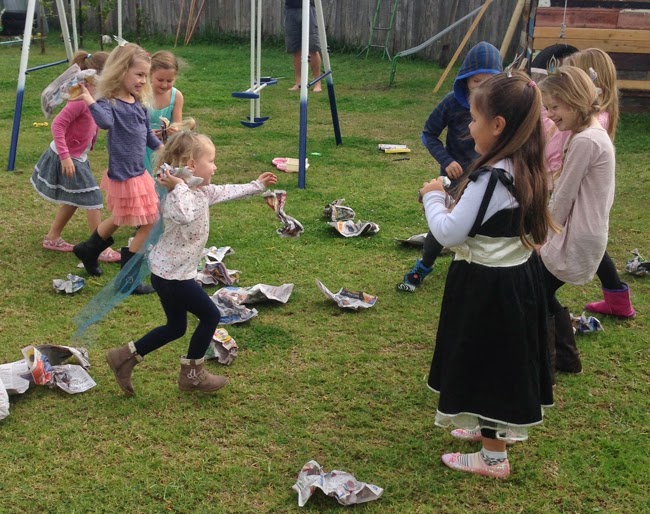
Snowball fight! This was everyone's favourite thing. The easiest, cheapest, non-decorative, non-time-wasting activity ever. Put the kids into teams, hand them a pile of newspaper, count down and let them scrunch up the paper and throw it at each other. First one to use up all their pile wins. They loved it. It's also a great way to spend a few minutes on a boring, rainy day - the kids and I have messed up our lounge room a few times doing so...


Indoor snowstorm Actually it was a toss up between the snowball fight and the indoor snowstorm that took the favourite thing title. Just for fun all the little Elsas got to wave their magical hands and create some snow. I chopped up a bunch of blue and white tissue paper and placed them into balloons. Then I blew them up, hung from the ceiling and when they performed their magic, popped the balloons. Down floated the "snow" and up went their voices into squeals of joy. It was pretty cute. Messy, of course, but nothing my vacuum cleaner couldn't fix! (which is why inside it better than outside - I'd have tissue paper squares in my grass for months if I'd done it outside!)


Snowflake cake I try to make food as easy as possible (for this party we had pancakes, yoghurt, waffles, scones, ham and cheese croissants, fruit and more in a buffet style) for myself. So while I made Layla a cake-from-scratch on her actual birthday (with strawberry buttercream - yum!), for the parties, I usually grab a plain double sponge cake from the supermarket and just ice it and decorate to make it a little more special. This time, I did a ruffle pattern with the butercream and then cut out some shapes for a snowflake pattern out of the ready-made white icing. A handful of blue sugar sprinkles finished it off. You can find a how-to for the ruffle icing (and how to make a mini cake out of cupcakes here).


The aftermath Hard icing all over the table + half-eaten biscuits and mashmallows stuck to all sorts of surfaces + a bench full of... crap + furniture in the wrong place + paper all over the floor and woolly rug = signs of a successful party! No I haven't painted the ceiling or floor yet. But the doors are done - yay! Baby steps...


The birthday morning surprise Party or not, I always try to make the actual birthday morning a little special - hanging balloons or streamers over the door or a decorated hallway - they love waking up to something. This year, I made some balloons animals and stuck them to Layla's door with an incredibly classy paper-plate sign. She loved it and those balloon animals are still living it up somewhere in the house. Balloons, cardboard and double-sided tape go a reeeallly long way in my house.

So there we have it - another party over! Layla had fun, her friends had fun and I had fun. Win win really! It wasn't TOO Frozen-ish, too girlie, too... much. It was a little bit trad (the kids also played pass the parcel and musical statues), a fair bit messy (snowflake decorating, snowball fight and inside snow storm), and a whole lot fun. Just as a kids birthday party should be!
1 bunch of flowers, 5 ways to decorate for Christmas entertaining with them
Flowers at Christmas? Of course! Why not - is there ever a bad time to fill your home with sweet-smelling, beautiful blooms? And during the biggest entertaining season of the year, it makes sense to splurge a little on some pretties and dress up your space. That doesn't mean you have to stick to those traditional Christmassy flowers like a red poinsettia as a centrepiece. Choose your faves and use them in unique ways on your table, walls and as Christmas decor. I was gifted a big bunch of gorgeous flowers from Freshflowers.com.au - the Eden bouquet, featuring oriental lilies, Singapore orchids, Ecuadorian roses and awesome King Protea. And after admiring them for a day or two, I pulled the arrangement apart and created various decorative ideas with them. Almost a week later I'm still waiting for the lillies to open, but the others, despite being glued, hung upside poked and prodded for days, are still going strong and are a bit of prettiness amongst the dust, dirt, grime, glue, cement and other mess of our bathroom renovation.

Some tools you'll need: scissors, string (I used gold-flecked baker's string and twine), doilies, craft wire, clear glass baubles (from Spotlight or Lincraft). Also handy and not pictured: hot glue gun, galvanised wire, paper, balloons, thumbtacks.

For these ideas, I took the flowers back to the garden. Luckily, in Australia, an outdoors Christmas is possible and so why not head outdoors this year (providing the rain stays away!). I think these ideas would work well inside or outside - also great for a high tea, baby or bridal shower. 


Idea 1: hanging blooms
So pretty dangling over the table - you can create a hanging centrepiece and keep the table virtually free (although I still popped a simple, single giant bloom on the table). I've hung the flowers from string before, but those glass baubles I stock up on each year were calling out for something too. Singapore orchids to the rescue! Pour a little water in the bauble (not too much - you don't want it too heavy) and gently squeeze an orchid through the mouth. Then tie on some string and hang - mine were from the garden umbrella, but a patio rafter would work just as well. Mix them with some single blooms of another variety and hang at different lengths for the best effect.


A Singapore orchid, just hanging around.... To remove from bauble, let the water out and use some tweezers to pull by the stem back through the mouth.


Idea 2: flowery wreath
A tiny bit inspired by the Roman wreath crowns, I thought the bendiness of the orchids would work well in a circular pattern. I made a wreath with part of a coil of galvanised wire three and twisted some craft wire in four equal points around the circle to secure. Two large and two small leaves from the lilies were glued onto the bottom with the hot glue gun and the orchids glued on top. The flowers were then carefully rearranged kind of jamming the little stems in between the wire. This is obviously not made to last much longer than a day or two! 
It looks so pretty hanging against the rustic old fence - perfect for a backyard soiree; equally as pretty on the door or wall.

Idea 3: simple, striking centrepiece
I have admired proteas in fabric form before (I had a cushion that featured a print of it), but have never seen one in the flesh. This guy is a King Protea and is very impressive. I may have stroked the  velvety petals (?) leaves (?) every time I walked past. So pretty. So he was perfect to place in a jar as a centrepiece all by himself. I just dressed up the jar with some half doilies taped around the base and tied up with twine.


Can't resist an aerial shot or two when something looks this good from above.


Idea 4: Bon bon decoration
Every year since I last hosted, I get roped in to make the bon bons. That's because instead of crummy jokes, plastic pieces of rubbish and flimsy paper hats, I fill them with Lindt chocolate balls, proper cardboard crowns (with sticky strips for the kids to decorate with at the kids table), useful gifts (like mini torch keyrings) and .... dirty Christmas jokes. Like seriously rude ones. I am kicking myself for not having a secret camera set up for the first time I did this. Only Steve knew about the jokes so seeing everyone's shocked, amused faces and fits of laughter as they read them to themselves before sharing with the group was priceless. It's a lot of fun, but I'm kind of running out of good dirty jokes. A lot of them border of lame so I might have to delve into further joke territory and move slightly outside solely Christmas. We'll see. Anyway, it's always fun to see pretty handmade crackers turn so incredibly filthy - very naughty and nice. This year, I'm thinking I'll dress them up with my fave combo of white and kraft paper, twine and a fresh flower. Bon bon snappers can be found at Spotlight and Lincraft - just insert them into toilet rolls or even DIYed cardboard tubes, fill with goodies and pretty up from the outside. The good thing about attractive bon bons is that they take the place of plate decor such as napkin rings and just-so cutlery, which I am usually pretty rubbish at.


 Idea 5: pinned doily vases
Occasionally, I love a good doily. They're able to make simple things just a fraction more special - like these doily stars I made a few years back. This time I thought why not crete a mini vase for a single bloom and pin them on a pinboard? I made a cone out of sturdy white paper, wrapped it inside a cone made from a doily and pinned it on the board. To keep the flower fresh, place it inside a balloon with a little bit of water and secure with an elastic band. Pop the balloon inside the doily and ta-da! Hanging temporary paper vases! You can find out how to make the painted pinboard here.

And there are just a few things to do with a bunch of beautiful flowers! You could also use them to make crowns or pin in hair instead of Christmas hats - that would certainly make your gathering a little more stylish! Of course, sticking them in a vase as is would also look pretty, but I quite like the idea of getting more mileage out of them! And of course there is no need to wake up at the crack of dawn and hit the flower markets or buy multiple bunches of various flowers to make up one mixed bunch - have them delivered to you. Freshflowers.com.au does just that - check the delivery availability postcode tool before you order though just in case!

The flowers in this post were gifted to me by Freshflowers.com.au - all ideas, images and copy is my own.
how to make a mini ruffle-icing cake (out of cupcakes)

rufflemain

For Layla’s sparkle birthday party I made my very first ruffle-icing cake. I also made a mini ruffle cake out of cupcakes for her cousin who shares the same birthday and is a year younger. And seeing as the (Green’s Vanilla) cupcakes tasted much better than Nigella’s buttermilk cake recipe (sorry Nigella) and most kids just eat the icing anyway, I thought it a nice occasional alternative to cupcakes.
I also thought just for fun I’d show you how to do the ruffle icing (no doubt incredibly amateurishly) – especially seeing as Jess asked for a tutorial. Though a cooking related-tutorial is the last thing I expected to ever be doing on this blog – I’m not the best cook, though I am trying to be better and am actually enjoying it a little more lately (probably because Layla is into it so it’s something we do together). But I did Google a how-to myself so I guess another one can’t hurt… I’m headless and hopeless at remembering what I’m meant to be talking about and Zak makes a special appearance and food-critic commentary (“mmmmmm”), but you should get the idea. It’s pretty simple. It’s also very late. I made this video the same week of Layla’s party. Which was more than a month ago (cue much groaning and sighing)…

ruffletools
Toolkit
* Cupcakes (I have tried a billion different recipes but nothing tastes as good as the packet mix Green’s Vanilla Cupcakes. I feel like a cheat but it is SO GOOD)
* A whole lotta butter cream (Nigella’s butter cream is yummo: 300g butter, 700g icing sugar, 1 tsp vanilla extract and 2 tbsn milk all mixed together and fluffy.
* A knife or spatula
* An icing bag and nozzle
* Silver balls and topper


How-to:
ruffle1
1. 
Make a cupcake sandwich by icing the bottom of a cake and sticking two together.

ruffle2

2. Ice the top and fill in the indent between the two cakes with a swab of icing. Yes, there will be a LOT of icing.


3. Follow the instructions on putting together your icing bag from the instructions and then pipe around the cake (see video).
ruffleclose
4. Finish with a topper and some silver balls or decoration of your choice.
5. Eat and enjoy and then be sick later. Possibly.
Have a fabbo weekend. We had a mini break this week in FREEZING COLD CANBERRA (um, it was -3 one morning. I don’t do cold very well. I certainly don’t do minus degrees. Brr). And I feel a little bit rested and refreshed (mostly due to the cold!). I hope to get back to more regular blogging soon.
Bx
{Images by Belinda Graham for The Happy Home}

41 Responses to “how to make a mini ruffle-icing cake (out of cupcakes)”

  1. Yummy! Those look delicious! Was it just food colouring you used to give it the green colour?
  2. bryn says:
    adorable!! love the colors.
  3. Holly says:
    Haha aw, I just loved the video!! So sweet. That looks DELICIOUS. And so full of icing, ha!
  4. Wow, the colors are just gorgeous! And I love the flag detail. So, so pretty!
    vanessa
  5. simplygrove says:
    You are SO cute!!!!! And the cake looks amazing!
  6. Kate says:
    That looks fantastic!
    Fun video too :)
  7. Rosemarie says:
    Loved this never thought of the cupcake sandwich. Video was brilliant loved how you still managed to get through it with a little additional directing from z! Rosemarie
  8. So cute! Loved seeing you live and hearing your voice and kids making noise in the background of course!!! xx
  9. Beth says:
    Greens are the best packet mixes! I use the Golden buttercake mix for my cupcakes. I’ve tried that many other recipes from scratch but i just can’t get them as light and fluffy as the Green’s! So now I don’t bother, so much easier and everyone always loves them! (Oh and the gluten free ones are pretty good too!)
  10. Alexandra says:
    Belinda what a fantastic idea. I am going to make these with pink icing for my baby shower in September.
    Beth do Greens have a gluten free cupcake mix? Or what brand are the gluten free cupcakes you are talking about?
  11. Anna says:
    I love the colour of your icing. Surely you can never have enough icing, well maybe :)
  12. Dorothy says:
    This looks so so so good. I really love that turqouise frosting—how did you make that color??
  13. fiona says:
    i love this… we will be trying this one
  14. [...] Mini ruffled cakes (out of cupcakes)? Yep, they’re as adorable as they sound. [...]
  15. This is so stinkin adorable, thanks for sharing!! Smiles~ Noelle
  16. Belinda says:
    thanks guys – the icing colour was my just adding blue and yellow until i came to this colour. i think i also mixed in a bit of pink to grey it up a bit at one stage. I’m all about trial and error! I used the Queen Natural colours (yellow and pink) and the normal no-doubt-bad-for-you blue. xx
  17. Totally gorgeous.. wow I can’t stop looking at it. Looks delicious too!
  18. Suzanne says:
    That looks amazing, my kids would love to try that too!
  19. [...] Mini icing ruffle cake – The Happy Home Blog } { Pastel M&M cake – Babble [...]
  20. cata says:
    Love the video!
    Thanks for sharing this amazing idea
    regards from Tuscany
    Cata
  21. Melissah says:
    I just discovered your lovely blog and I look forward to popping by again for some more inspiration! I’ve just put the finished touches on my new blog ‘Coastal Style’ It will have lots of inspiration on beach houses, resortwear, summer food, travel and anything ‘beachy’. I had a lot of fun putting it together so maybe you would like to check it out if you have a spare minute.
    http://coastal-style.blogspot.com/
    x
    Melissah
  22. [...] The Happy Home Blog Love it?Like this:LikeBe the first to like this post. from → Inspiração ← Look of Long Lez No comments yet [...]
  23. Jenifer says:
    I love this! Thank you for sharing. I am reposting on my site tomorrow and crediting and linking back to you. If this is a problem in any way, just let me know and I will remove the posting. Such a genius idea this is!
  24. Belinda says:
    not a problem at all jennifer! link away x
  25. [...] paper tags via Papermash; this side table via Perfectly Imperfect; this mini ruffled cake via The Happy Home; these cute pencils via Flickr {heather pauline}; this chalkboard via Daniel Usenko; these paper [...]
  26. Classic video!! Loved it. Of course, bubby will cry during filming! :)
  27. [...] Wow holiday guests with mint green ruffle-icing mini-cakes. Find the tutorial on The Happy Home Blog. [...]
  28. [...] Matos Chaves Bill Cheesbourg Eddie Cheever Andrea Chiesa Ettore Chimeri Louis Chiron Joie Chitwood Posted by at 9:11 [...]
  29. [...] macarons, ice cream cake, ruffle cake, cupcakes [...]
  30. [...] macarons, ice cream cake, ruffle cake, cupcakes [...]
  31. [...] :: macarons :: sfophoto on flickr, ice cream cake :: martha stewart, ruffle cake :: the happy home blog, cupcakes :: annie’s eats Pin itShare and Enjoy: Filed Under: [...]
  32. Jennifer says:
    Love this! Am sharing on FB! :)
  33. Pragna Raval says:
    what tip is it youre using???
  34. Found this via Pinterest. And I just have to say. Its GENIUS! I sooo have to make myself one of those soon. Thank you for sharing!
  35. Belinda says:
    Pragna, the tip is a Wilton Star Tip 22 – not sure if these tips are universal or not (I know nothing about cooking and cooking appliances/apparatus etc!) but that is what the box says!! To be honest you’d get a ruffle with any tip if you do the same sort of motion – the ruffles would just vary I guess! x
  36. [...] finish, making it a perfect treat for one special someone. The best part of this single serving Mini Ruffle-Icing Cake, however, is that you get to eat it all by yourself. Frosting and [...]
  37. I think my hubby would kill me for eating something so sweet lol but it does look very good. I love the colour and I hope it taste’s as good as it looks!
    Thanks for the detailed recipe hun!
    Holly X
  38. stephanie says:
    I loved your video, talented baker who is also a mom! I related to all the mommy elements on this video, and just loved it
  39. [...] wedding cake with bow via Brides :: Mini cake with gold beads via :: Teal ruffled mini cake via The Happy Home (recipe included!) :: Lemon Rhubarb Mascarpone Mousse Cake via Delectable Deliciousness (recipe [...]