
crafty decorating: painted cork-tile pinboard

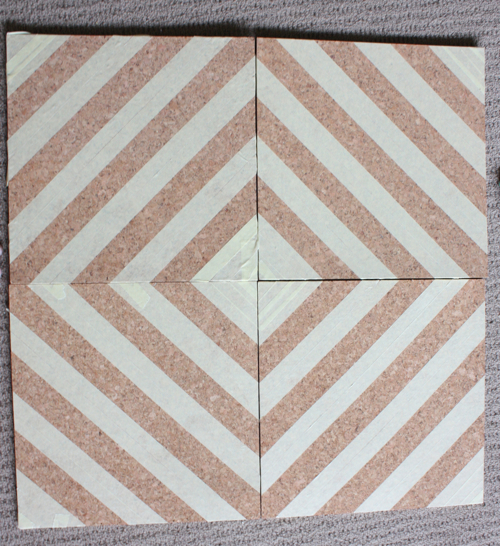
My poor desk has been sitting there covered in papers and bills (ugh) for way too long. It needed something to make it look a little bit more inspirational than it did so I would actually want to sit there and work. And now, I think it does! I wasn’t going to do a moodboard and I’m still not sure if I’ll bother with the typical magazine tear-sheet moodboard – because I hate ripping up my magazines! And I have no time and patience to do the photo thing I wanted to do – maybe somewhere else another time. So for now, it was a graphic pinboard of some kind for a few pictures, cards, photos and other bits and bobs I feel like hanging/dangling/pinning on it. I was thinking of stencilling something, but then I realised I keep doodling this diamond-ish pattern so I decided to translate it in giant-scale on some cork tiles.

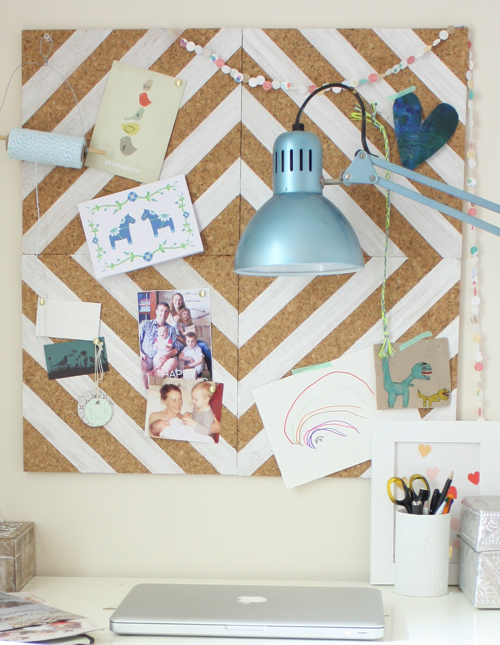
Oh look! More handmade touches – I made this cushion out of two napkins, the twine hanger was made with dowel and thin wire, the lamp is an Ikea Tertial spraypainted blue, the garland is another one I made from scrap papers and a half-inch circle punch. Rainbow and sticker art by Layla, dinosaurs by Zak. He is such an awesome drawer.
What I love about this simple pattern and duplicate tiles is that i can change it up – the same tiles can be rearranged to be a chevron pattern or diagonal stripe. I also left space on either side to add to the tiles if I want to later on. They’re simply stuck up with
3M Command Picture Hanging Strips*
which are easily removable from the walls (thank goodness as I’m renting!) but also meant that if I DO rearrange, it’s as simple as pulling the tiles off, and pressing them back in as they’ll just click into place. Awesome. If you’re keen to DIY, I of course took some pics of the process. Why not make the project process even more drawn-out?! Ha! Here’s how.

You’ll need:
Cork tiles – mine are from Bunnings, $13-odd for packet of 6. They’re floor tiles so quite thick and hardy.
Painter’s tape
White paint
3M Command Picture Hanging Strips
– I used 4 small velcro-style strips per cork tile
A paintbrush
Also helpful: a ruler and pencil

Step 1:
The easiest way to do this corner angle is to measure the same distance from the corner on both sides, mark and then line up the tape to the markings. I couldn’t find a ruler – of course – so used the 3M tape itself to measure everything. As multi-functional as it is genius. Tape off your corner and then cover the whole triangle with tape if you want to (or if your 3-year-old daughter is going to be painting it and you want to ensure the paint only goes in the right areas).

Step 2:
Use your ruler – or in my case – your 3M tape! – to measure the distance you want the stripes to be. Steve said you could use maths as well but PFFT. I’m not even going to go there (not even close to my strongest subject). Tape it up and around the edges and repeat – mine ended up being (coincidentally, but very helpfully) the same size as two strips of masking tape. Repeat with all tiles the same way. The maths way is something about dividing up the lengths of each side…
Step 3:
Arrange your tiles in the pattern you desire to ensure the stripes line up well enough.- with this simple pattern you can do this diamond, diagonal stripes or chevron. Don’t you love options?! If you couldn’t be bothered to keep redoing the pattern to get it right later on, mark the tiles on the back (top-left, top-right etc).

Step 4:
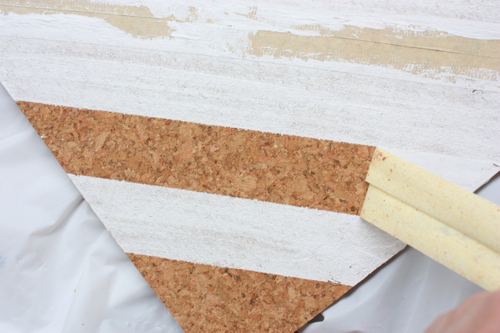
Have your slave child paint the remaining cork. Then go over it yourself to redistribute the paint that all ended up on the one cork tile in huge glumps. Paint the tile in smooth strokes in the one direction. Leave to dry.
Step 5:
My favourite part about painting with tape – peeling it back to see super-straight neat non-bleeding lines. Yay!
Step 6:
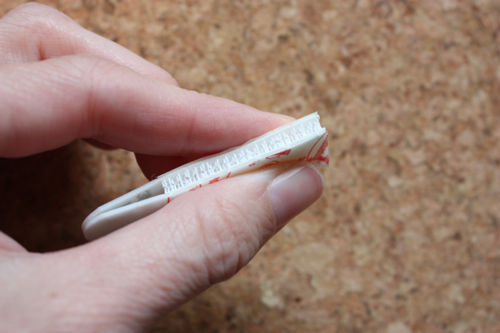
Stick two 3M Command picture strips together – they click together a little like velcro.

Step 7:
Peel off the backing tape off one of the sides, stick into place on the tile. I used one in each corner for super-strength and also to ensure the tile was evenly set off the wall – it sinks a tiny bit in the middle when you press in a tack, but is not going anywhere! Stick into place on the wall and repeat with all tiles until you have your pattern. These strips are great for any kind of wall hanging you want to change up – photos in frames can easily be swapped by simply taking the frame off – leaving the strip on the wall still – and then pressing back into place. Same might go if I rearrange my pinboard (although if the tiles turn to the sides they might not fit in perfectly, but they should still stay put.)
Step 8:
Stick, pin, tape, hang, decorate!

And one more to see it in the rest of the room… There is an Expedit to the right of the kids table. I really should take a picture of the whole space, but it’s always so messy… Even too messy to show you how messy it is, if you know what I mean. Normally I’m happy to do that, but at the moment, sheesh – the place is appalling. I had to turn down an impromptu playdate today because the place looked like a bunch of teenagers had been allowed to live in it parent-free for a week. That bad.
Anyway, there is my new pinboard. I just need some things to pin on it now! It’s a bit sparse, but it was mainly to show the pattern. I kind of don’t want to cover it up too much… I like diamonds. Real ones too! x
* I was sent a packet of 3M hooks to use in some way and enter into a
competition. I think if you read my blog regularly you’ll know how I feel about them (I love and use them for EVERYTHING) so I decided against a review and incorporated the competition requirements – image, link and mention – into this project instead. My project has been shortlisted as one of the top 8 and it’s now down to votes. If you have a spare minute and enjoyed this project, please pop by to Facebook and “like” my project
(I am assuming a like is a vote?!?!) to vote. I would very much like to win the prize.
Thanks!
{Images by Belinda Graham for The Happy Home}