Posts tagged top tips
{The reno files} A real-life renovation guide: Choosing a team, getting quotes and the trades you may need
reno 1.jpg

Like every other aspect of every other renovation, how you do this will be different to the next person. I can only let you know what I experienced. Choosing a builder/carpenter/certifier etc might be done at the start of your project before you even get ideas. It might not be done until you have approval for your plans or somewhere in-between. The trick with this is this: you can get a ballpark figure of what something might cost you when you're throwing ideas around. But until the plans are approved, the engineer's report is done and they specify what materials are required to build your place, no-one can you give you an accurate price guide. And even then, there are always (ALWAYS!) surprises, problems, muck-ups and/or changes which will affect your bottom line. I discovered this when I started shooting off my draft plans to some local builders whose work I admired. They couldn't really give me a quote until I had the engineer's report. But I couldn't get an engineer's report until I had council approval. And what if what I had approval for ended up being a lot more than we estimated? Because engineers throw in things like steel, bracing, expensive materials, extra footings and extra... stuff! And with that extra stuff comes extra labour to put all the extras in. And it all adds up. To a lot.

But that part of things aside, how do you find the right person? Well sometimes, it's the one person who actually turns up and gives you a quote. Not even kidding - builders are notorious for just not showing up. I had two not arrive, one gave me an estimate range where the difference was $100,000. Another just said he wouldn't do it until I had all the plans. I thought with such a big build, we should go with a proper top-notch builder and complete team. And they all let me down. So we looked into home building courses and what was required and went back to our carpenter who had done some other works at our house. He was qualified as a builder but didn't enjoy doing it - preferred to actually build than manage. He broke down the build and gave us quotes for each aspect of it as he expected it to be if he had free reign to build. We knew there would be extra things that might come with the engineer, but we at least had a guide as to what wouldn't change (brick footings/roof etc) and what would differ depending on materials we chose (decks, flooring etc). He made suggestions and listened to ours. He was happy for us to go owner/builder and for Steve to labour occasionally when he was able to. We decided to go that route and waited for our approval.

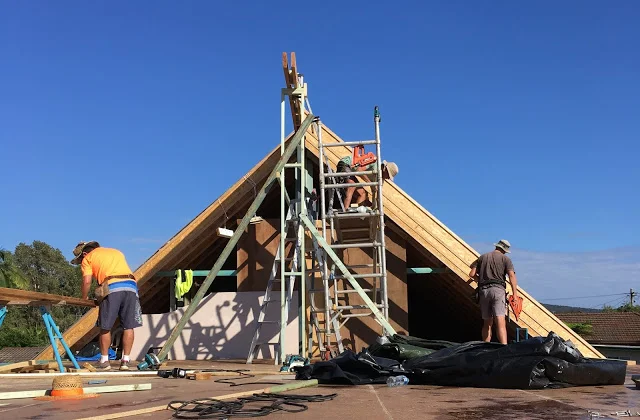
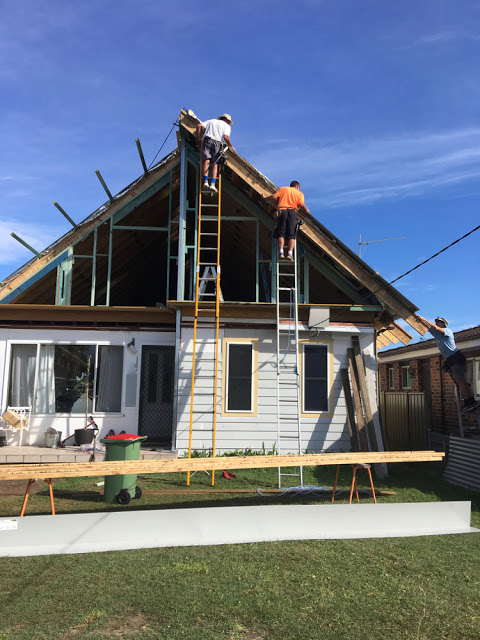
Just before council finally stamped our plans (the first time!), Steve decided he had had it with his stressful job and the travel it took to get there (2.5 hours a day). The money was great, but health and happiness is worth more to us so we worked out he'd be able to take some time to work out what he wanted to do and we could still afford to eat and start our build. We just wouldn't be able to do it all in one hit. He decided carpentry was something he wanted to try - he might as well give it a go while work was being done here anyway, right? We spoke to our carpenter about him labouring full time whenever work started and Darren was more than happy with it. He was excited about being able to teach him and suggested there might even come a time when he could join his team. It turned out his apprentice left soon after and Steve had a job. So while we waited for final approval, then for the engineer, then for the certifier to issue our certificate of construction (this all took months after council's second - and final - approval), Steve earned some money working and learning. By the time it was our turn to start work on our job, he'd had a few months under his belt and was confident on the tools. With his new tradie nickname (Steve-O. Of course!) we were ready to begin.

We have a few bonuses building our house this way: our builder acts as our project manager - he orders everything, organises other trades, liaises with the certifier and the engineer. We don't have to take on those trickier jobs. He also - so graciously - does this for no extra cost to his (special-for-us) hourly wage. Another bonus is he came with a ready-made team of other subcontractors so we don't have to go looking for the right electrician, plumber, Gyprocker, etc. And there are many: so far on this job we have used:

Termite and pest man

Brick-layers

Concrete mixer

Sand delivery

Electrician

Hire shop for concrete cutters, scaffold, giant ladders

Plumber

Window maker

Roofer

Crane driver

Welder

Gyprocker

Fireplace installer

Super special electrician to upgrade mains

Still to come (er, most likely not their official titles): stair man, waterproofer, tiler, tv and sound guy, rain tank dude... They're the ones I know about!

We are also lucky our builder is close with the local hardware and so is able to occasionally negotiate better prices on some materials (also, set up a trade account so you get a tradie discount - every little bit counts!). All this to say, we know exactly what things cost because we get a copy of every receipt so there is no mark-ups on materials which I do know can happen.

In the interest of keeping it real, the downside of all this of course is that we often get bumped for another job - generosity of mates rates can stretch so far! So we've been delayed several times as other jobs have spilled overtime or delayed as well due to weather etc. It's not the best way to build, obviously, but we've happily taken this aspect of it on as we know those in-between times mean Steve is earning money too and it's actually nice to have a break from people in and out of your house every day, the constant cleaning, the noise and the fact I have control issues and don't want to go too far in case someone makes a decision on something without me! Ha!

Now I realise this isn't possible for everyone, so I've included some tips on finding a good team. We've only ever used two carpenters in our renovations of our homes - one did the last one; this team has done this house. Coincidentally, our current builder actually apprenticed at one stage for our first one! My point is: find a good one and you'll likely develop a pretty close relationship with them. They see you at your worst - first thing in the morning, when your house is a tip, when you're yelling at the kids to get ready for school (and when they backchat you and the fun and games that comes after that happens!). They become part of your life for a while and so you want to find someone you're comfortable with and who gets what you're trying to do and isn't just out to take your money. This has become somewhat of a showhouse for our builder - it's become his pride and joy too as it's a good example of his work to show other potential clients. You want someone who is passionate about what they do and who wants to be proud of the work they do for you so much so they might photograph it for their website or portfolio - or tell potential clients to swing by and check out the deck/extension/cladding job they did at this place... How to find that person? Yes, well... it's not easy! Maybe we completely fluked it? Maybe it's because we still live in that small-town-feel-kinda-place where people are just happy to get their weekly wage to pay their mortgages and drink beer? Whatever the reason, we got lucky twice. So maybe some of these will help you too.

Speak to your local hardware

Ask for recommendations for a good carpenter/builder - this is how we found ours. Not from Bunnings (Bunnings aren't known to be a trade hardware - they've dedicated themselves to the home DIYer as trades make up such a tiny percentage of their clientele), try the smaller ones or trade chains such as Home Hardware or Mitre 10. These guys know them well - they're in there most days ordering or picking up materials. They chat about the jobs they're working on and they use the hardware as a kind of network to find other subcontractors or labourers if they need an extra pair of hands. The hardware guys aren't stupid - they know the ones who know their stuff, who are down to earth and who are passionate about their work. And they happily pass their details on if you ask them. Same goes for a plumber or electrician - ask at the local plumbing stores (Eagles or Reece Trade) or lighting/electrical stores.

Do a door knock 

I'm not ashamed to say I've door knocked several people and asked them who built/renovated their house! Turns out one builder who did three homes I loved lived in my street (and gave us a quote but the timing was all wrong. And then he moved!), while another I also really liked was booked out for around two years! But isn't that the best kind of advertising for a builder? Having a highly visible portfolio? And I was able to get first hand info on how happy the client was too. If you love a home nearby, go and knock on the door and chat to the owner. They might not know - maybe they moved in and it was already perfect - but if nothing else, you get to meet someone with taste similar to your own (and maybe even get to have a little snoop inside too!) and will probably make their day with your compliment!

Try

HiPages

 I've heard about this for so long and written about it so often but never really knew how it works. Basically, a builder (or pretty much any other trade) pays a large fee each year to be listed. When someone is after a quote for, say, a deck, they will get three quotes. From your end, you get three quotes for the same job. From the other end, if a carpenter agrees to do the quote, they have to pay a fee to HiPages regardless of whether or not they get the job. This means you're only going to get people who are serious about working - because they have to outlay money no matter what. It kind of weeds out the muck-arounds! It also has a good directory on their site for tradies of all sorts in your area.

Ask for recommendations

Oldie but a goodie, of course. If you know someone is renovating, ask them all about who they used, if they were happy with their work and if they'd use them again.

Try out-of-towners

I told our builder I think he keeps getting Sydney calls for quotes because they're hoping if they bring in an outsider, they might get a cheaper quote. And honestly, I think I'm right. I'm adamant that our extension and renovation would be close to triple the amount if we lived in Sydney. Everything outside of the major cities is more affordable - including tradespeople.

Good signs...

*

 They actually show up to your house (seriously).

* They listen to what you want and make suggestions of their own that enhance your idea or offer an on-par alternative.

* They do some measuring on the spot when you're unsure if something will fit and will try their best to make your ideas and plans work.

* They seem genuinely happy to be there and passionate about what they do.

* They will rework their quotes or offer alternatives/options to help you keep costs down or meet a budget.

* They're happy for you to help in some way.

Bad signs...

* They are straight-up negative about what you want to do. "It won't work." "It won't fit". "It's a nightmare job". etc

* They push you towards an easier/more common option because it's less work for them.

* They seem a bit iffy about when they could fit you in - it could be legitimate, but it could also mean they don't want the job.^

Going the owner/builder route

This is what we ended up doing. I'm not going to go too much into it because we kind of cheated and even though we're responsible etc, our builder has taken over this role for us (yay!). But, I'll link you to a section from the

Real Living Renovations

magazine I wrote for more information. And just FYI, we did our White Card/Owner Builder Permit course via

Absolute Education

. It's really not difficult at all - the answers are all there, you just have to read it!

^ FYI: if a tradie doesn't really want the hassle of a job (it's really labour-intensive/filthy/fiddly and time-consuming/lots of roof work in the height of summer or a potential landmine of extra nightmares such as an old house that has lots of secrets inside its walls you won't know about until you start pulling them down), then they tend to increase their quote by a fair bit. This is a hint they don't want the work, but it also means that if you agree to it, they are compensated for the crappiness that will come with them accepting. And I've been on the other side of this - Steve comes home completely exhausted and filthy some days. He's been covered in old insulation, stuck in confined spaces or has been jackhammering concrete floors ALL DAY. Compare that to the joys of building a deck or pergola on a nice spring day! I don't know many people who'd choose the former over the latter!

Well, I hope that helps a little. It's hard finding someone good and it's even harder getting their timings to line up perfectly with yours. But you'll find them - I'm sure of it!

And for more of my Reno Files posts...

{The reno files} A real-life renovation guide: the design process

{The reno files} A real-life renovation guide: introduction

Our house plans: spending big to live small(ish)

A very exciting renovation update

A real, hopefully helpful and honest guide to renovating your bathroom

Beautifying and highlighting imperfections in the home
gold leaf kintsugi 1.jpg

If you've read my waffle for the past 9 and a half years (seriously, that is how long I've been blogging. That is scary.) you'll know how I'm not big on perfection. Perfect spaces, perfect people, perfect things - they are not real to me. Add a little wonkiness to a house, some mess to the waves of someone's hair or a few tell-tale signs of age on items and they become more interesting to me. And usually more beautiful. Recently I read about Kintsugi - a Japanese art form that sees damaged items repaired with gold (or silver). Rather than throw away broken crockery or smooth over cracks in rendered walls, the imperfections are highlighted with gold leaf and sealed with lacquer, creating an interesting feature of a home or allowing a favourite plate to continue dishing out your meals - with a little bling on the side. The method humanises things - giving them some attention, patching them up and letting them continue on their merry way rather than just giving up on them at the first sign of a breakdown. It's giving even the most ho-hum items a history, a story and a chance to shine. It's such a sweet sentiment in this throwaway world, and because I love gold leaf - and maybe because Marie Kondo and her whole "socks have feelings too" craziness has rubbed off on me more than I thought - I had to try it out on some damaged things I had around the house. 

First up: the small wooden bowl Steve found in the water on one of our walks a few years ago. It was green and gooey on one side and stunk like goodness knows what, but we thought it might clean up ok. So we soaked it and scrubbed it and it did clean up beautifully - but it was cracked in several places. So in went the size, and in went the gold leaf. It's certainly not the neatest follow-the-line I've ever done, but that's the whole point about this method: imperfections can be beautiful, and the wonkiness just gives it even more character. I love the glimmer on the rustic wood - I could never tire of that combo! 

Next, I hit up the kitchen cabinet where my Nana's dishes were. The pink floral plate was part of a few sets my grandparents bought many decades ago for my mum's wedding. I had a full set once - complete with tea cups and saucers - and accidentally threw the wrong box on the charity pile (and managed to keep a whole bunch of unwanted crap on the keep pile instead! Eek!) so I only have a few pieces left. I knew there was a big chip out of one of the side plates, so a few minutes later that chip looked a whole lot chipper (sorry) with its new gold coat - especially since the plate is gold-rimmed. I also blinged up a few op-shop pieces - several chips in a little star candlestick and the tiniest crack in a milk-glass bowl.

I actually thought that was all I had when a few nights later I decided to try my hand at making a wooden spoon out of a piece of driftwood and a lino-carving tool. Obviously, neither of these things are going to work as well as, say, proper wood and a real wood-carving knife. But I wanted to see what it was like to do before I invested in a proper knife and so had a play. It was strangely addictive - I drew a shape, cut and carved with the rounded lino tool (and yes, cut myself several times) and in an hour or so had a pretty cool shaped spoon. Except a knot was right where the rounded end of the spoon was and soon became a hole! And then, while wondering when I should quit it on the handle -  SNAP! I wondered too long so the whole thing broke. I originally threw it on the compost, but decided to keep my very first attempt at spoon carving because I really enjoyed doing it - even if it was never going to be able to be used as a spoon, was not even close to smooth and had a hole in a crucial part of it. Steve glued it together for me and I gave it the gold treatment. Now, rather than just being a weird unfinished, holey, broken wooden spoon, it's got a story, a history and a little bit of prettiness about it. I love that!

It's kind of an addictive idea - I can't help look around the house and see other imperfections I'd love to highlight somehow: holes in the floorboards from old knots, cracks in the concrete driveway... I'm completely in love with both of these ideas, above, from the

original article

I read about kintsugi. The art form is not just about gold leaf, but also patching things with similar materials but in different shapes, colours or patterns - such as adding the odd patterned tile in a bathroom wall of solid colour tiles. It really is giving the less-than-perfect aspects of a home some time in the spotlight to shine. And who doesn't like that occasionally?

{Top 3 images by Belinda Graham for The Happy Home. Concrete and gold leaf image is an part of an installation called Seam by Catherine Bertolt via

Workplace Gallery

; Patchwork timber floorboard via

Material Valley

}

A real, hopefully helpful, honest guide to renovating your bathroom


Renovating and decorating is so personal. One person's penchant for trends is another's personal time-warpy nightmare back to when they lived with it the first time (kind of like the '80s fashion that keeps coming back!). Regardless of what you choose to outfit your bathroom, the process of renovating it can be pretty overwhelming. I thought I'd outline some of the things I considered, some problems that appeared, some tips and tricks I learnt along the way. I've now renovated two bathrooms (our current house / our old house) and one laundry/WC and am by no means an expert by any stretch of the imagination. But I do think I have some tips to share. And I like to share; I have a blog, don't I?! I also spoke to Dana of House*Tweaking who recently revealed her bathroom renovation and has some good advice too, because it's nice to hear from others who've been through the same thing. This is by no means all the information ever on renovating a bathroom, but it might help in some small way - even if it's tip on taking a million photos so you have some back-up for tradies who might have lost all their important notes written on the wall to an over-zealous plasterer...

Finding your tradies
Ask anyone - ANYONE - who has ever used a tradesman for anything ever and they will say "oh so-and-so came out to give me a quote and I never heard from them again." I have no answer for this annoying trait, but maybe it's in their manual... So yes, you will likely get someone who will waste your time, but you need to find one first, right? Here are a few tips.

Ask around and get recommendations. We knew no one when we renovated our first house - not a soul - so we asked the local hardware store and they gave us the name of a carpenter who ended up doing our whole house. The smaller local hardwares are best - they know their stuff and they work closely with regular, local tradespeople who aren't just after the cheapest price for materials.

You don't need to use a dedicated bathroom place. I don't know much about them but I would hazard a guess that they know what they're doing BUT you'll pay for it.

A good carpenter/builder will know good plumbers, electricians, tilers, plasters - anyone else you'll need for the job. So one recommendation will usually result in a whole team. Same goes the opposite way - if you've ever used a plumber or electrician for another job, they may know a good builder for the job too. These types of tradies are usually contracted by various builders so they get to know them well - who pays them well, treats them well, is organised, who produces good work. They're one of the best sources of recommendations.

Try to have a good idea of what you want before you get someone out. We never got anyone out for any work until we knew exactly what we wanted. But we welcomed their advice and suggestions and even made some of their changes.

The right person for the job is not just the best price. You want someone who is willing to work with you to get you what YOU want - not what THEY want (and there will be some who only want to do what they want. We had a tiler who didn't want to do a feature cause it was in the too-hard basket; another builder didn't like our layout and wanted to change it to something that was less work for him!). We chose our carpenter for our first house because he tried his best to bring our plans to life, even when others had dismissed them (We wanted a certain layout with a door in the middle of a wall. Two builders looked at my sketch and said it couldn't be done. The carpenter actually measured the space and suggested we use a narrower-than-normal door. He got the job.)

Coming up with a layout
This may be dependent on budget, but if you have the luxury to have the space redesigned, here are some things to think about while playing interior designer...


Invest in grid paper and make each square equal 50cm in real life. That's what I do with everything! Draw up your space and measure your existing shower/bath/vanity/toilet space as a guide so you know what you're playing with.

Think about moving utilities to make the best layout for you. A narrow bathroom works well with the bath or shower at the far end.

Consider moving the wet spaces furthest from the door - I don't know about you, but my kids make a huge wet mess every time they have a bath. Toilet trips and teeth brushing meant wet feet right before bed in our old bathroom because they had to pass the bath to get to the sink and their socks (in winter) would get all wet. Or they'd slip over. Now, the vanity is right at the door and the bath/shower beyond it. It hasn't stopped the problem completely, but it's much, much better.

Don't let windows throw you. We have twice now kept the window in the shower/bath - tilers can waterproof and tile around them and with semi-opaque glass or window adhesive, there is no problem with privacy!

Think about moving the door. A door in the centre of a wall gives you another option for a small bathroom - you can place the toilet on one side and the vanity on the other of the same wall with the door in the middle. Open the door so it opens to the side with the toilet. We did this in our first bathroom renovation, pictured above. My bathroom MO hasn't changed much, has it?!

Consider gaps between things like vanities and baths or the wall. You don't want any gaps that you can't get your hand/arm into to clean. Trust me, it's gross. Either leave enough space to get in there or have no gap. There are all sorts of nasties lurking in those hard-to-reach places.

Make sure you really have space for everything - seriously, write a list of all that you require to be in your bathroom that will take up floorspace: laundry basket, bin, toilet brush, toilet paper holder, a stool for the kids... and then make sure you have enough room for it all!

Give yourself enough room on either side of the toilet - I'd allocate a minimum of 80cm to a toilet, with it centred in that space. It's best to place it in a corner so it's close to a wall so the toilet-roll holder is in line with your arm while you're, um, sitting on the throne, rather than having to bend around and do gymnastics to the wall behind you. We have 40cm from the edge of the toilet to the wall on one side and 70cm from the other edge of the toilet to the bath on the other. The smaller space allows a spot for a bin and toilet brush while the bigger space has a tree trunk (temporarily - when I get my butt into gear and go to Ikea, it will house a step stool for the kids.)

Give yourself plenty of space in front of the toilet too - our vanity is 60cm away from it, allowing a thoroughfare for little people to wander in (!), but I wouldn't want to go any closer to it.

Give careful thought to which end you want your showerscreen/taps - you want to make sure you have enough clearance to get in and out of the shower - especially if there is a vanity nearby. You also need to be careful your screen won't smash into anything if you're going to have it swivel, like ours does. Ours opens onto the wall, which is ideal.

Consider a recessed sliding door into the room if space is tight - no door swing might allow you a bigger vanity or more toilet room. You can also request a narrower door or have it slightly shaved if need be. Sometimes a few millimetres can make a huge difference to something fitting perfectly or your layout changing completely!

Don't waste your chance to squeeze in extra storage - recessed wall cabinets might be your thing, try built-in shelving like we did for towels and toilet paper or, if you only have space for a small vanity, think about building in a small ledge above the vanity for toiletries you use everyday but have no space on the sink for.

Making it pretty and practical
You've pinned and stalked Instagram for snippets of bathroom styles you love. Now for a reality check: don't be blinded by the prettiness of some pictures - magazines or styled images always remove signs of life (shampoo/soap/toilet roll stash/scales/toilet brushes etc) so what you're seeing is not necessarily how your space will look should you replicate it. Instead, take note of the things you find repeating themselves in your fave pictures (colour, natural materials, a particular tile) and see if you can work that into your space. Practical AND pretty is what you want. Not just pretty. Here are a few ways you may be able to get it.


Think of different places for your electrical outlets. We placed ours behind the door - it's close enough to the vanity but out of reach of children and water and can't be seen day-to-day. If you rarely use electronics in the bathroom, this might be ideal - or perhaps in a wall cabinet.

Really think about the colour of the grout - especially on the floor. White tiles with white grout on the floor is just asking for trouble. You might as well just choose grey grout because it will inevitably turn grey anyway! My personal preference is a darker floor with lighter walls. If you like the look of darker bathrooms (and we're gearing towards the dark side for our ensuite), I'd still make the floor darker than the walls. I just think they look top-heavy if the walls are darker and it feels off balance. Again, personal opinion but one to consider.

Test your floor tiles at the store - natural stones with a bit of texture are less slippery than smooth tiles. Take a bottle of water with you and wipe a bit of water onto the tile and see how slippery they are. It's a small, not-perfect test but you'd be surprised how slippery they can be. And NEVER use wall tiles on the floor. You might read this with a crinkled-up "well DER" face but in our last rental, they had used the wall tiles all over the bathroom - including the floor. And we hit the deck more times than I'd like to remember. Plus they had cracked in several places on the floor - I'm only assuming here, but I wondered if wall tiles are thinner than floor tiles and this was the reason? Either way, I cursed that bathroom every time I used it!

Consider your showerscreen options Fixed, frameless shower screens are quite lovely to look at, but if you have a shower over your bath or have little kids, a showerscreen that swivels is a great idea. It still can be frameless for the invisible look, but the hinged style of it allows easy access to taps, bathing little ones and cleaning (you can rinse off the outside of it in the shower!

Avoid bath "shelves" When tiling around a bath, depending on the style, you might have the bath sit into a frame which could leave a little tiled "shelf" along the edge (see my picture at the top of the post for detail). This all sounds well and good in theory, but the water pools here like nothing else and the grout stains so easily. I'd ask your builder for other options.

Think about how the floor will match the floor in the rest of your home We chose a grey floor tile that worked well with our whitewashed floors. We're actually planning to resand the floors and stain them when we extend. I'll be choosing a cooler, grey-based stain to match for flow. Orangey pine floors might clash with cool-coloured tiles. Bring a sample tile home and check it in natural light and at night to see if it works. It's not one that can be easily fixed!

Think about what kind of sink you want and who is using it - I always wanted an above-counter sink. To me, it acts like a wall for items on the benchtop - handy when you have young children who are awesome at moving things around randomly and knocking things into the sink. So many times our toothbrush holder was knocked in - along with anything else sitting on the benchtop. It's seems a small annoyance, but appears to be big enough to warrant a change.

Mixers vs individual taps Mixer taps are pretty popular, but I don't like them in a bathroom. In the bath, they are so easy for kids to bump or play with, potentially causing burns. Steve's story about his childhood friend whose skin was burnt from a bathtub has haunted me, so they were out. I considered using one on the vanity but I wanted the same style tap throughout the bathroom.

The range of ready-made vanities might be limited depending on the style of taps you want. I wanted wall-hung taps to show off the cross style I chose with an above-counter basin. Could I easily find a vanity that had no holes in it for the taps? Nope! It was a challenge - most have one hole for a mixer tap or three for your standard-style taps. I was trying to get a good deal on eBay or a hardware store but was limited. In the end, I found BTH, which has a good range.

Tiling around a window ledge, but will cost you a fair bit more than standard tiling. This is due to them having to grind angles on each tile for the corners. Just so you know!

The smaller the tile, the higher the price! Not necessarily the tiles themselves, but apparently all tilers have a hatred for mosaic tiles, so they charge you for them! I was told the rule of thumb was: the smaller the tile, the higher the price to lay them per square metre. My subway tiles cost a fair bit more than regular square tiles would have; mosaics or smaller squares would have cost even more. Next time I think I'll choose gigantic tiles!

Tiling is surprisingly expensive. I'm not sure why this surprises me, but it does. Aside from the carpenter's bill, the tiler was the next expensive. His fee came in at around $2000. To cut costs, we only tiled to the ceiling around the shower area. The walls away from the wet area we did just above the tap line for the vanity. Then for the built-in shelving we just did a border tile near the floor. The bonus thing about doing a half wall of tiles in areas that don't need it is if you install a towel rail or hooks, you're not drilling through tile so they can be moved if you realise you need something different or in a different spot. It happens.

The bigger tile you use on the floor, the smaller amount of grout you need to clean! I'd balance out the large-style floor tiles with a smaller wall tile...

Heat lamps might not be the prettiest thing ever but if you decide against underfloor heating, they are so good. I won't shower without the heat on in winter - it really does make a difference. And you don't look up so no worries!

Discuss with the plumber where the showerhead will sit to ensure it's the right height for everyone. If someone in the family is above-average height (like Steve!), it might need to be installed higher than normal - especially if it's in a bath, which is always slightly higher than the floor level. You might also need a longer arm from the wall if it's a large-circumference showerhead (like our rainfall one) to ensure the right amout of clearance from the wall and so you don't need to angle the showerhead everytime you take a shower.

A few more top tips...
Some miscellaneous things I thought might also be of interest. Warning: poo talk is involved.

Water-saving bits can be removed I do my bit to help the environment but I REFUSE to have a terrible-flowing shower. We bought a rainfall showerhead and were so excited and then the first few showers were pathetic. And the bath took 24 years to run. I asked the plumber what could be done and he just said "I'll just remove the water-saving device in them." Five minutes later we had a fast-running bath and a heavenly rainfall showerhead. They are the only two taps I've removed them from, but a little luxury is good for the soul.

Take photographs of each stage of the renovation From demolition, to re-studding, to the plumbing bits fitted, images of the various stages can really help when small hiccups occur. It's amazing how often the photographs of the studs came in handy. When the time came to install the hooks, the builder's notification to themselves of where their stud was had been plastered over. And when the builders forgot to cut a hole for their electrican's cables for our oven in the kitchen, my photos helped the electrician work out where it was so the damage was minimal.

Plan ahead If you're going to install a towel rail or hooks for towels on a wall, have the builders put a stud or noggin in place where they'll go so it's not just screwed into the plasterboard.

Look at your toilet. Really look at it. I made the mistake of just buying the narrowest toilet I could find that didn't have plastic parts (I didn't want a plastic seat). But once it was all in and our bathroom was in working order we quickly discovered annoyances that has Steve and I hanging for a pristinely perfect toilet in our ensuite! Inspect the inside of it - you don't want an opening that is too small that waste will not be flushed out properly. I'd also avoid toilets with a bit of a "shelf" on the inside. Excuse my potty talk, but when you have small children who tend to do their business close to the front of the toilet, there are issues with their, um, "presents" collecting on the little shelf and not flushing properly, leaving lovely artwork-style marks and generally stinking up the place. It's like the toilets I came across a lot while in Germany. I hated those things! The best styles are bowl-style with a large opening at the base. And that's the end of the poo talk!

Baths - especially bath/shower combinations - will move over time. So keep in mind the grout might crack slightly after a bit of use and you may need to redo the grout and the silicone around the edges too. Mine needs to be done, I'm still working on finding some time to do that! 

Have the tiler look at the toilet base before he begins tiling - some require the tiles to be cut perfectly around the base as the plumbing IS the base, while other toilet's have a base that fits over the plumbing and therefore will cover the tiles.

Strange smells will be temporary Oh wait, I lied. A little more poo talk: you might discover a delightful (!!) sewerage smell while your bathroom is being renovated. This will disapper once the toilet is fitted with S-bends so just bear with it for a little while. (It's still gross).

SAVE vs SPLURGE
This is another one of those things people will debate about. MY opinion is this...
Save
Taps: All have water-saving devices these days and need to be made to meet a certain standard, so they're all going to be pretty similar. I bought our taps from Bunnings and they were the higher end of their range but still a lot more affordable than at a bathroom store.
Tiles: Tiles have a huge range of prices for the same kind of thing. I bought all my tiles from Bunnings and even the tilers suggested I get them there as they were a great price and a good tile. IF you want a particular tile or a feature wall of amazingness, then this would move into the splurge section. In my bathroom, we used simple styles so no need to pay through the teeth for them.
Toilets: Again, they need to meet standards and have water-ratings. I'd just avoid anything with a plastic seat/cistern.
Hardware: Towel rails, toilet-roll holder and hooks - I just can't justify spending a lot of these items. As long as the quality is good - they seem sturdy and look nice, does it really matter if they're bargain-priced?

Splurge
Vanity: This is your one real piece of furniture in the room, you want it to be a bit of a focus and nice looking so I'd buy a nice one. Ensure it's not going to blow out if it gets water-damage, so badly-sealed laminates (on edges) are not a great idea.
Custom fittings: Built-in shelves, recessed shelving or door changes can be huge game-changers to a space so are worth spending on.
Tiling: You might not have a choice! They're expensive! But we're glad we upped the budget to allow for the half walls of tiles on the vanity and toilet walls rather than just a floor border. It was worth it to us (plus - happier there are tiles behind a toilet rather than just a wall!)

BUT WAIT! THERE'S MORE!!!!!
I spoke to the lovely Dana from House*Tweaking - owner of this pretty space, below - for her top tips for renovating a bathroom. Here's someone else's perspective:


If possible, work with the current layout to keep costs down In a perfect world, I would have moved the tub / shower plumbing to the opposite wall but we saved $$ by keeping it in the original location.

Choose classic finishes for longevity Bathroom materials aren't the easiest to switch out (as opposed to, say, a pillow on a sofa). Subway tile, hexagon tile and/or penny rounds in neutral colours are good go-tos.

Take a risk! I had my heart set on a vintage cast iron tub set in a wood saddle base, but had no tutorial to follow and many people tried to talk us out of it. We made it up as we went along and somehow pulled it off (above). It's one of my favorite projects to date.

Choose your grout colour wisely Light grey or sandy-coloured floor grout is super family-friendly!

Information overload? You could play a drinking game for the number of times I said "consider" or "think"!! I do hope some of it's helpful. And I'm sure there are a million more tips and tricks to renovating and decorating a bathroom space effectively, but you'll come across some of them as you tackle it. And if you've already learnt some, feel free to share them in the comments section for those who are gathering as much information as they possibly can! If you're after more tips about renovating in general, try this post for some things I've learnt along the way.

{Top images by Belinda Graham for The Happy Home; bottom image by Dana Miller for House*Tweaking}
Sneak peek at my kitchen + a little interview

THIS IS MY KITCHEN! It's almost finished! Well it is finished aside from a little painting and kickboard installation. We finally - after a whole year - had a tiler come and do the splashback. I don't know why I waited so long! I had debated for a long time about doing it myself like last time but there were a few too many tricky cuts around the rangehood and the windowsill and it was all just a bit in the too-hard basket... So last week they came and made it all pretty and now it just feels so complete. And this is Annika and I in it, celebrating this fact. Well not really, but we do look happy, don't we? She wasn't at all happy for me to take this picture though, hence her being in it - she was very grizzly and in no mood to be put down. So rather than listen to all the screaming while I attempted to play model AND photographer, she joined in. It turned out rather blurry but I'm cool with that. 

I'll show you more of this space later, but the reason for the picture was for a little interview I thought I'd share with you. My good friend Natalie has a relatively newish blog called The Indigo Crew where she writes about life with her three kids - crafts, adventures, books, brands and more. She has so many great ideas and a beautiful aesthetic - you should go and check it out and be inspired. Nat has recently started a couple of new series on her blog, chatting to fellow mothers and creatives she's discovered on Instagram and beyond. She kicked the series off with Courtney Adamo from Babyccino Kids and I was happy to follow (though what an act to follow!) - answering 10 questions covering my childhood, my present and the future. I talk about my teenage self's career plans to something I've learnt to something I thought I'd never do (oh that would be yelling at my kids! Eek!). You can have a little read here and be sure to check back Tuesdays to see who else she has in store - I know she has a few good ones up her sleeve! She's also started to chat to the creatives behind great brands, such as Dee Purdy behind gorgeous clothing label Une Belle Epoque - their gorgeous linen Can Can tops get a workout at our place by Imogen and Annika! I was surprised and impressed to discover the label is her side project and she has a busy career in finance - learning things like that make me want to light a fire under my butt and get myself inspired to make my dreams come true (though pinning the actual dream down is kind of difficult at the moment!). Read more about Dee and her lovely label here

And just for fun, here are a couple more (blurry!) shots from that day... The sun was streaming through the back doors, which was lovely, but it wreaked havoc on the image of the stool legs (they're actually back!) Have a great weekend!

DIY cleaning products (that work better than anything I've bought)
cleaning .jpg

Sit down. I have to tell you something. All of a sudden, I enjoy cleaning. I also am starting to despise any kind of mess and am obsessed with decluttering. Living more simply seems to be where we're heading, but that's a whole other post. This one is still about that first bomb I dropped. I enjoy cleaning. WHO AM I? I am now clearly related to my clean-freak sister Kristie and equally neat Aunty Norma. Ok, I'm not that clean and tidy yet, but baby steps... Anyway, it started innocently enough - the dishes I'd leave in the sink overnight unwashed (YES. I did that. Eww) were nowhere to be seen. In fact, if the kitchen didn't sparkle before I went to bed, the next morning would just start bad and the whole day would go downhill from there. The three baskets of laundry that would overflow for a week and be tipped out onto the floor numerous times a day to find Zak's sock's pair or Immy's undies reduced to one basket that is almost always empty because I had this novel idea to put the washing away as soon as I grabbed it off the line. The shower is scrubbed every few days; the toilet daily, I vacuum several times a week and enjoy smacking the shizz out of my rug outside with Zak's plastic baseball bat (I hang it over the swing set and get so much enjoyment out of that - take out all frustration. I even let the kids at it. Layla is particularly good at whacking it). I've even ordered some old-fashioned wooden cleaning brushes to really get into the zone. In short. I enjoy cleaning. So much so, I'd look up DIY cleaning products on Pinterest while nursing Annika. I am SUCH a social butterfly...

Everyone knows the genius of baking soda, vinegar and lemon. I've tried the usual combinations before but always felt they lacked something (and not just a decent scent!) and for a while I even did the incredible great pairing of bleach and baking soda. Hardly good for anyone - and even then, the bath stains remained and the soap scum on the shower glass refused to budge. But now, I'm happy to have found some great recipes that are pretty easy to make and actually work. Not just work, but work better than anything I've bought at the store. Not even exaggerating. And because I made them myself, I could make the packing pretty too. So I dug out some old jars and repurposed an empty Murchison-Hume into the new mint all-purpose spray, which by the way, is genius.

So far I've made the all-purpose cleaner, a tub scrub, a laundry powder and a not-so-successful (but only because it wouldn't fit through the spray nozzle) stain remover. (If I master that one, I'll let you know.) My house and laundry are smelling so scrumptious lately, I had to share with you too. 

LAVENDER WASHING POWDER

*

Since moving out of home, the only washing powder Steve (and the kids) didn't have a reaction to was Omo Sensitive and the Eco Store powder. Everything else? Eczema breakouts and if I ever added any kind of softener? Rashes and allergic reactions. So to be perfectly honest, I was not expecting this to go anywhere, but they haven't had any reactions at all, which is brilliant because it smells so yummy, cleans so well and makes everything it washes feel good, clean and fresh. The original recipe I copied called for unscented soap, but I figured rather than adding essential oils, I could use the scented soap instead - that way, I can mix it up and try different "flavours" next time without having to spring for more essentials oils (I want to try peppermint next!)

You'll need:

1 bar Castile soap

(I used Dr Bronner's Pure Castile soap in Lavender)

1 cup Borax

(from the laundry aisle of the supermarket - Coles had it; Woollies didn't)

1 cup Washing Soda

(also from laundry aisle - not to be confused with baking soda. In my searches I've discovered you can make washing soda by baking the baking soda in a try in your oven. Baking it removes one of the carbonates, meaning it's no longer bi-carbonate soda, but carbonate soda, which is washing soda. Sheesh, I am such an expert on these things now).

How to:

1.

Grate your bar of soap into a bowl. The kids can - and will want to - help you with this. It is unavoidable if they are around. Just let them, a little grated skin is not going to harm your clothes! Ha!

2.

Add the Borax and Washing soda.

3.

The original recipe just required you to mix it together (you could add a few drops of essential oils if you used unscented soap, or if you wanted to pair to scents - I'd imagine vanilla and lavender would be a nice combination). After stirring it looked a bit too chunky for my liking. I only use cold water in my machine and wasn't sure the soap would dissolve so well. So i put a few batches of it through the Baby Bullet (a coffee grinder or good blender should also do the trick) and used the milling blade. It totally dissolved the grated soap and turned it into total powder. It looks like store bought stuff. 

4.

Place in a container of your choice. At first I put it back into an Omo container I had - it filled it about three quarters of the way. But then to pretty it up, I made good use of this jar I had in the back of my cupboard.

5.

Use one tablespoon of powder per load. I use two scoops of this wooden spoon.

PEPPERMINT ALL-PURPOSE SPRAY

**

I'm really shocked at how well this worked. Normally, trying to get rid of marks on the bath involved spraying with whatever bleach-ish spray I had and watching it streak the bath and not actually come away when I scrubbed it. This sprays on, scrubs off beautifully and leaves it looking brand new again (my bath is not even a year old yet so kinda new anyway but it has been grubby and this clears it right up). I use it on the counter, the loo, the tiles, the shower screen... It hasn't come out of the bathroom yet, but I might make a different scent for the kitchen...

You'll need:

A spray bottle

Liquid castile soap (I used Dr. Bronner's Liquid Castile Soap in Peppermint)

Water

Tea Tree Oil

How to:

Add two tablespoons of castile soap to each cup of water. Add a few drops of tea tree oil to the mix. Then shake and spray!

ORANGE TUB SCRUB

**

Ever wondered if ever there was a way to recycle your egg shells? Well stop! There is! Apparently, egg shells all ground up is basically calcium powder, which you can take as a supplement (I'd read up more on this before doing so though) or use to scrub your bathtub super-clean! Think of it as the cleaning regime's equivalent of an exfoliator. The finely ground shells are still gritty enough to scrub away at the surface, removing stains and grime. Plus it smells heavenly.

You'll need:

Egg shells - I used about a dozen and a half.

Baking soda (bi-carbonate soda). I used the same volume as whatever the eggshells made up.

20 drops of orange essential oil

How to:

1.

Collect your shells over a couple of weeks. I rinsed as I used them, then left in a container. When you're ready, place in a pot of boiling water on the stovetop and boil for around 10 to 15 minutes. Remove and lie on a tray and leave to fully dry - I left them in the sun, overnight and again in the sun for a few hours before crushing.

2.

In smallish batches, I gently broke them up a little more and placed in the baby bullet (a food processor or coffee grinder would also work). Using the milling blade, I blended until the shells were basically obliterated. It turned to powder. 

3.

Once all the shells were now calcium powder, I placed in a jar and added an equal part of baking soda (bi-carbonate soda). 

4.

Shake the jar until blended. Add your essential oil around five drops at a time, mix with the handle of a small spoon until all mixed up and no lumps!

5.

Use a small spoon or your fingers to sprinkle onto the surface you want to scrub. I sprinkle onto a wet sink or bath and scrub away, adding more water as I need to. 

And there you have it! Three easy to make cleaners that make your home smell sooooo good. And not a vinegar bottle in sight. (Though my next experiment is a vinegar-based floor wash with essential oils...) I'd love to hear your own stories of using homemade products - I was pretty skeptical a while back when the vinegar/bi-carb thing didn't work. But these versions - and the castile soap - seem to be the right mix. I'm keen to try more - disinfectant, dishwashing tablets.... What worked for you?! 

And in the interest of keeping things real, here is how my bathroom looked while shooting the pics. The sink kept casting a shadow on the bottles, so I raised them with a marble board! Books to the rescue again!

Turkish towel and wooden spoon, Honey I'm Home (local store); Marble tray from Aldi; diamond jar from Hot Dollar (I think); tiny brown vase is a baby panadol bottle; brown spray bottle, Muchison Hume.

* My adaptation of

this recipe

from

Step Into My Green World

** My adaptations of the recipes from

Little Green Notebook