Posts tagged bedroom
finally! our master bedroom
Sheesh, I've been slow with this. That's because it's still not finished, but will it ever be? Probably not. Because it's not even going to be our master bedroom forever - when we extend, we'll be building a new one on the back of the house (yay!) and this will become Zak's. But in the meantime, it's ours. And so here was our plan:

I have no rug yet, no lamp for Steve and no ticking stripe. I also haven't got the curtains organised yet because we'll be changing the window soon(ish) and so I'll wait until then. We're living with the timber venetians that came with the house for now. What we have done (and please ignore dirty mirror and wrinkled bed linen - I don't iron), is this:


The floors were whitewashed by yours truly and I love them. It was quite the experiment and I will write about it, but there were things I'm going to do differently the second time around, so I'll wait to do Zak's room so I can show you properly. The whole house will eventually be like this and I can't wait.

A word on my diamond light before I go on... Well. I absolutely love it - I planned a lot of this space around that darn thing - a dark wall, a white cord with gold fitting (I spraypainted it) so the diamond shape would really stand out. And after waiting MONTHS to install it (we waited until we had all the lights installed in the room properly), it blew in less than three HOURS. How unimpressed was I? NOT AT ALL. And just to annoy me even more, the store I bought it from just said they didn't stock it anymore - no offer to replace with something else or refund or even apologise... And all the publicity I gave them too... Oh well. So I usually have a normal light bulb in the bedside one, but seeing as I am rarely in bed reading, I'm just leaving the diamond in for a while - it's all about look, right? It can look pretty in the daytime! Just not practical...


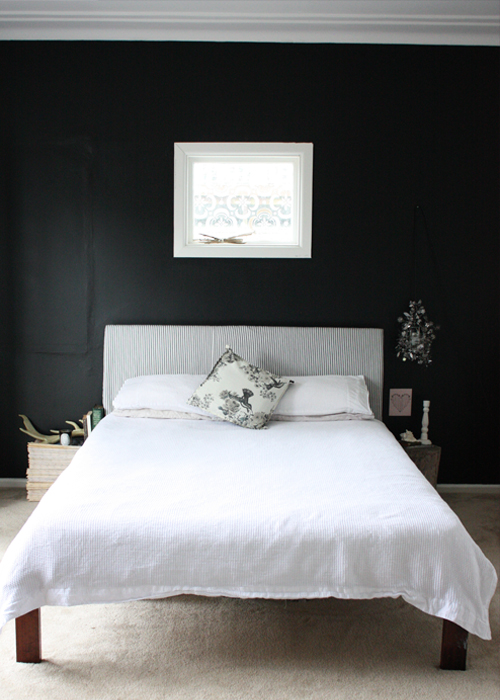
Back to the room... The dark grey feature wall became a feature wall after the wallpaper that had been on the wall refused to come off. I probably could have hired a steamer or tried different things on the market, but my patience ran out after a little while of wallpaper removal and I looked at other options. The wallpaper had been painted and so all the removal took the paint off, but not the paper. I gave up when I had an idea to panel it. We decided to try it ourselves and I ordered the pine siding - it came in linear metres (so they just provided enough timber for the amount of metres I needed, but they were random lengths). In the end they weren't random lengths, which was annoying because I could have ordered a few more and just had them all the one perfect length of the room. And they also arrived slightly warped. We assumed it would just kind of straighten on the wall but no. The panels didn't slip into each other as they should so after spending a morning measuring and cutting the panels to fit (we ended up doing a kind of patchwork look) our patience ran out again really quickly (let's blame the baby I'm growing shall we? For Steve too - why not) and Steve decided to cut off the lips of each panel and we just screwed them to the wall (in the studs, obviously) and got on with it. 


I wondered how it'd turn out - some of the gaps are pretty big. But after patching some of the joints with wood putty and painting it, I love it. It kind of looks like an old weatherboard wall that we have painted - not a brand new one and I like that. I don't do perfect too well anyway!! We can also see some knots and grain, which is a nice change to the flatness of the white walls. And I LOVE the colour - it's Rhino Grey by British Paints and is a magical colour-changing colour. Sometimes it's grey, sometimes it's a bluey colour, othertimes it looks black. I am thinking it'd make an awesome exterior colour too - we plan to paint the outside dark, so this might be it! Hydrangea is from my garden (I love being able to say that).

 I covered my headboard with this herringbone fabric - it's actually a curtain from Spotlight that I grabbed for $10 a metre during a recent sale. It's just pinned at the back and can be easily removed. We're planning to buy a king-sized bed eventually so I'm happy with this for the time being.

 Our main bedroom light is this capiz shell chandellier. I've always wanted one of these - I love the tinkle it makes in the breeze - I thought it'd drive me nuts but it is just off centre to the open windows so is in a perfect spot!

Annoyingly, our bed can't be centred against the wall just yet (I moved it over slightly for this picture) because we have dressers and a rack on the left and need some room for Steve to actually walk past! Eventually we will have a built-in and that white chest of drawers will move into Zak's room, but for now, this is how it is.

 Steve's side is looking a bit sad at the moment - he has the tree stump at the moment but it looks very lost. I think maybe a crate or rustic stool or something might be better...


Ignore filthy mirror... This chest of drawers has had several lives. It is a temporary addition and holds all my clothes (well, the ones I wear - there is an entire cabin filled with boxes of clothes still that I obviously don't need or wear! Due to a serious lack of storage in the house, we're all just keeping a few faves on high rotation!). The Z is a mini marquee light - I'll post a how-to soon, and the tiny gold vase is one I made and gold-leafed.


I found this brass stork (?) in a charity shop for $5. The bell jar is from Kmart and the books are just a selection of well-read ones topped with the birthday book that has been handed down through my family from my great-grandmother. The white bowl is one I made from clay and gold-leafed the edge.


And just to keep it real - here is the other side of the room. At this moment my sideboard is housing half the bathroom while it's being renovated and the other side of the TV has an assortment of picture frames and washing baskets and Christmas ornaments.... This is our hanging space at the moment - a cheap rack until we get a built-in (in the same spot next to the door).


 My "helpers"!

And so that is it - for now! There will be changes and there are still a fair few things to do in this room, but I'm happy to have one room relatively done! And it's a nice preview in terms of colour and floor to to what the rest of the house will eventually look like. And I'm happy with that!

Still to do:
+ Built-in wardrobe
+ Paint the door
+ Replace the window
+ Add curtains
+ Buy a new bed
+ Work out side tables
+ Buy a rug and lamp for Steve

Room sources for those interested...
White walls: Dulux Lexicon quarter strength
Dark wall: British Paints Rhino Grey
Floor: my own concoction - separate post to come
Capiz chandelier: Jezebel Small Capiz Shell Pendant Light, $34, Lighting Illusions
Side pendant: Create 1 Light Pendant in White, $31.95 (on special), Beacon Lighting
Diamond lightbulb: Eric Therner Diamond Lights - try eBay or international stores, I don't think Australia has stockists anymore.
Moroccan side table: local store, but try My Island Home
Ikat cushion: Table Tonic
Headboard fabric: Spotlight


{All images by Belinda Graham for The Happy Home}
master bedroom moodboard

We are SLOWLY making progress in the bedroom. It hasn't been quite as fast as I though it'd be, but between being sick for going on FIVE WEEKS and being pregnant (12 weeks!), I'm not nearly as energetic as I'd like to be. That said, I've quite enjoyed the process. The bedroom was kind of a trial and error room. I wanted light Scandinavian-style floors - sort of whitewashed. I researched and researched and researched various ways to get the look and will do a whole post on it soon because it's not the norm. Which is another reason why it's taken so long! It's bit of an experimental room, really - the sanding, the sequence, the floor... hopefully it all turns out ok!

Just for fun, I thought I'd show you where I'm headed with this moodboard - I am kind of imagining this house to eventually be rather modern on the outside - so far our very, very rough sketches and builder ideas are more modern than I thought I'd ever have, but I'm starting to like the idea. On the inside, I just keep repeating these words: cosy, Scandinavian, Moroccan, mid-century, boho, beachy. If some of them sound wrong together, just know that I mean I'll take certain aspects of each "style" (a feeling, a shape, a motif, a palette) and make sure they all mix together well. I think all of these things will work in the bedroom - let's see, so far, we have...

1. Linen bedhead We will eventually get a new bed (we're keen a on a king size - lots of little people occasionally share our bed and it's getting cramped!) and I'd like to try making my own headboard. Problem is, I'm kind of stuck on what style I want. I really this one (Deborah Needleman's bedroom), but think it might be a bit too decorative/romantic for the rest of the space. Maybe just a rectangular shaped headboard with a nice pattern in the nailheads... The bed won't happen right away, so I've got time to work that out! Image via nymag.com

2. Aina curtains in grey, $79, Ikea. I had these in the natural colour in my old home in the bedroom and living room - they're a beautiful linen and let just the right amount of light through. This time, I'm going with the grey. I'm also thinking the same fabric would make the nice bedhead whenever that time comes!

3. Ticking fabric - somewhere whether it's pillowslips or cushions. I adore the simplicity of ticking fabric so it's a must.

4. Jezebel Small Capiz Shell Pendant Light, $34, Lighting Illusions I bought this light a few weeks ago - just waiting for the electrician to come (oh I suppose that is up to us to actually call him, right?!) and install for us! The tinkling will likely drive us batty if there is a breeze, but I love these shells and think it'll look lovely hanging in the centre of the room. Better than the ugly round batten fitting we have now.

5. Arlec Pharmacy Desk Lamp, $42.90, Bunnings I swear the price of this has gone up since last week, but anyway! Steve doesn't particularly want a lamp next to his bed, but he'll be getting one anyway. And I'll be attacking it with gold spraypaint.

6. Create 1 Light Pendant in White, $31.95 (on special), Beacon Lighting I grabbed one of these and spraypainted the top and bottom part gold (of course I did). I used Rust-Oleum Bright Coat in Gold and it worked a treat. This will hang over my bedside table (yet to be decided!) with....

7. Eric Therner Diamond Light, $45, Fat Shack Vintage Unfortunately it looks like they don't have them anymore, but this is where mine is from. I forced my sister to buy it for me for my birthday (not quite - we just tell each other what we want each year!). I love it - and you can really see its distinct shape against a dark backdrop.

8. Whitewashed floorboards. I'll write a whole post on what we did for ours, but they kind of look a little bit like this (maybe not quite so white...)

9. Horizontal tongue and groove paneling I'm excited about this - just revving ourselves up to do it! This will hide the remnants of the old wallpaper I stupidly decided to remove. Old painted-over wallpaper, super-duper glue and absolutely no patience do not a good combination make. For the sake of future owner's sanity, never put up wallpaper and then paint over it. Anyway. I had decided I wanted panelling somewhere and when the wallpaper removal process took longer than it should, I decided that wall was perfect for it. And it will be - our bed will be up against that wall and it will look so purdy all nice and charcoal. It will hopefully look a little something like this - colour and all. Image via Real Living magazine

10. Moroccan Trellis Shag Rug, Overstock.com I love this rug as I may have mentioned last post. Still working on the hubby's approval :)

11. Paint colours We went with Dulux Lexicon in quarter strength for the walls, ceilings (low-sheen) and trim (semi-gloss). I like my whites to be very white so this was the closest to untinted that you can get! I also prefer to have either huge contrast in trims (ie, a dark wall and white trim) or no contrast - I don't like two different shades of white so close to each other. To me it just always makes one of them look dirty! The feature wall paneling will probably be British Paints Rhino Grey. The lamps will be spraypainted in Rust-Oleum Bright Coat Gold.

12. Parker sideboard Have I mentioned this sideboard before? I found this exact same Parker sideboard on the side of the road. Yes, for free. And better still, the man who had put it on the clean-up pile happily delivered it to me as I couldn't carry it by myself (he only lived 100 metres down the road). How nice is that? It's in great condition and is huge - aroubd 230cm long! I did a little research and I've seen the same one sell for $2000. So not a bad find, I'd say! This will house most of my clothes for now until we can turn the bedroom next to us into a walk-in and ensuite. Image via julietsbalcony.com.au

So there we go! Still need to work out side tables - I might use my tree stump again or scour some local charity stores and council clean-up piles for something I can save and fix up. I'm sure I'll find something eventually! Hopefully I'll be able to show you this moodboard translated into an actual room soon enough! Stay tuned! x
bedroom makeover: new black wall

I think it’d be safe to say I love my new black wall. I had a feeling I would – as soon as I started slapping on the black paint I could picture it finished with the side tables and new/old lamp. And this is exactly how I pictured it. I wish the rest of the room looked this clean and tidy, but it’s not even close. From the end of the bed there is this-sized-space-and-a-half, and it’s mostly piled with all the stuff I slid out of view for this picture hehe.


I changed my mind about the chalkboard paint – they do have a water-based version but was out of stock so I went for Wattyl Low-Sheen in Colorbond Night Sky. Pretty much a perfect match to my beloved chalkboard. Two coats is all it took!
My side: an old tree stump is my side table. Wondered what happened to my Tord Boontje garland light? Wonder no more – here it is! In case you’ve been living a world that doesn’t have design blogs or interiors magazine, let me tell you: hanging lightbulbs as bedside lamps with cord casually hanging from the wall or ceiling? Totally hot right now. Possibly and probably started by Sibella Court who has one in her bedroom. Of course mine is neither vintage or a cool designer find and is a total cheat: a handheld workman’s lamp from Bunnings of all places ($18!) with the garland wrapped around it. But I like it and that’s all that matters.


Steve’s side: the newspaper pile again (Steve is a newspaper editor so we have quite the fire hazard collection of newspapers) with some fave books, an antler and fig candle.
Now I just need to get myself organised to finish the rest of the room… One day! More importantly, do we like?!

{images by Belinda Graham for The Happy Home}
behind the scenes: real living mag kids room shoot
shopping - nurseries may 10-1

So a couple of months ago, I helped Nat out on her mammoth shopping shoot: kids rooms. Mammoth because there are three rooms that need to be created, it has to be to a certain budget, it has to be newish and cool and it’d be ideal if it actually looks like a real room. My big pet hate with shoots was getting the images back and the “rooms” not looking like real rooms. So I love that Natalie really fills hers out – there is STUFF in them, they’re imperfect and they actually look like someone might live there.

behindscenes1an idea of the studio and how small the “rooms” are
behindscenes2
props tables arranged by “room”

You also have to work fast. Nat had two days to build three rooms, put together furniture, decorate and style it up. And you really have to do everything – when you arrive at the huge studio space, you have a few tables for props, a wall of windows and a few huge panels and brackets. These are your walls: you slip the panels into the brackets on the floor and slide them together to create a corner or longer wall. It’s never perfect so it’s digital production specialist Bi to the rescue later on to do electronically what a carpenter and plasterer would do in real life: seal the gaps together and make them seamless.

behindscenes4The Young Explorer’s room stage 1. I moved the walls in place and stuck up the map collage.

shopping - nurseries may 10-2In the mag. Click to enlarge
And then? You paint, wallpaper or create a wall-map collage, you lay a floor, hang curtains and use a giant L-shaped arm to hang a light fitting. You have to build the furniture from flatpack and unwrap everything being careful not to destroy the packaging (it all has to go back in perfect condition to be sold later) and marking what went where. Then you customise the furniture, you make toys, iron linen, hang decorations and fold clothes. There’s careful toy-in-basket-on-top-of-blankets placement so they peek out the top even though the basket is too deep for the limited amount of toys you have. You hang wallpaper with double-sided and masking tape and cross your fingers it doesn’t fall down overnight before the photographer can snap it. And then you can start moving in, changing things around, styling it up and trialling and erroring until it looks right… And that’s all we got up to when I hot-footed it out of there for my ridiculously long drive home in peak-hour traffic.

behindscenes4Circus room stage 1. I “wallpapered” with double-sided tape along the sides and masking tape on the top and bottom.
shopping - nurseries may 10-3In the mag. Click to enlarge
I couldn’t go the next day, but I’m 100% sure it was hectic. Nat still had to place the rest of the items (these pics was how the space looked when I left), style it up and work with Chris Warnes while he photographed it. And then? Then she HAD TO PACK IT ALL UP!!!!!!!!! Oh yes, as if it wasn’t enough you have to build the set, you have to take it allllll down again too. And put it back perfectly. All before 6pm. Eek. She did have a few other elves (thank goodness for those three keen interns!), but she did the hardest yards.
behindscenes3Pastel princess stage 1: quite different in the end result: walls are flipped around and furniture different. I made the pom pom garland and height chart.
shopping - nurseries may 10-4In the mag: click to enlarge
So shoots are hectic, hard work and stressful, but look at what she created? Aren’t they gorgeous? My fave is the young explorers – Zak would LOVE that room, being world-obsessed. What’s yours?
{behind-the-scenes images by Belinda Graham for The Happy Home; scans courtesy Real Living mag via Daily Imprint}

24 Responses to “behind the scenes: real living mag kids room shoot”

  1. yes see, I’m the dopey one, I thought these gorgeous rooms were real rooms!!! shows how easy to copy them if you really want to!
  2. MicP says:
    That is sooo awesome! Thanks for sharing behind the scenes pics!
  3. peta says:
    mine is the explorer one too! I have already been pooring over the pages – and working out what i need. I am most definately using that map wallpaper idea. i love it! my only concern is attaching to the wall and getting a nice smooth finish. …
  4. kathy says:
    Was just looking at these rooms last night as I perused the new mag. I love them all!
    So many great ideas there to take away, even from the ‘boy’theme ones I can use some ideas in my girls rooms.
    Thanks – love your creativity!
  5. Amanda says:
    Wow what a great look behind the scenes! It looks like despite the hard work and stress that it would have been really fun too!
  6. Viv says:
    Ohh I really like this post! Thank you for sharing. How exciting that you were able to be involved in the setup and it definitely looks like a lot of hard work went into it. You couldn’t tell from the photos though, it all looks effortless and like a real room.
  7. Katrina says:
    Thanks so much for sharing – this is my DREAM job! Loved seeing how it came together. I loved the rooms too. Fab job.
    Hope you are having a great day x
  8. Amanda says:
    This was such a great post Belinda – I loved reading and seeing photos of how a magazine shoot comes together – you’d never tell they weren’t real rooms. Although I can see it’s lots of hard work and must be a long day, it must be so much fun gathering ideas and styling the ‘rooms’. Thanks for sharing x
  9. miss mellie says:
    oh wow how fantastic. thats my dream to be a mag stylist so it was good having a sneek peek into it!! ahhh so inspired
  10. Debora says:
    How fun! Love the behind the scenes look.
    x
  11. Hazel says:
    Love it! I love Real Living magazine and now can really appreciate the effort that goes into preparing the shoots!
    :) Hazel
  12. Alison May says:
    Oooh thank you for this: I can’t tell you how much I adore seeing behind the scenes stuff… it kinda makes real life feel more workable you know?
  13. This is such a fantastic pot, love it. Thanks so much for sharing your experience it’s so interesting to see what really goes on behind the scenes :)
  14. Oops I meant ‘fantastic post’ but I’m sure you got that ;)
  15. Piper says:
    Thank you for sharing these behind the scene pics – I always have dreamed of being a stylist – now I get to take a peek at what it’s like! It’s amazing how the rooms get created…so inspiring :)
  16. Piper says:
    oh btw…saw you over on real living blog yesterday – how fun :)
  17. amy prior says:
    I love being able to see how you do these shots in real life- looks like tonnes of fun
  18. Jane says:
    Fascinating post about the behind-the-scenes workings of a mag shoot! It does look like pretty hard work but the results speak for themselves. My favourite rooms were a tie between the explorers and the princess, because the princess room is not too girly but feminine enough to know it’s for a little lady. Well done!
  19. Alison Gibbs says:
    Thanks for an insight to the ‘reality’ of a Real Living shoot.
    Alison
  20. Lynda says:
    This is so amazing! Many years ago pre-kids I worked in fashion and advertising and styled many photo shoots. We too worked in warehouse type buildings and constructetd what we needed. I’m completely blown away to see what you guys have built in such a short amount of time and how fabulous it looks. You must be so very proud of your involvement in this project!
    I’d just feel better if it was in Inside Out, not ‘Real’ Living
    Lynda
  21. fat mum slim says:
    That’s so cool to see behind the scenes. So much work goes into it, and I’ve always wondered how it works. I have a new appreciation now. x
  22. Abby says:
    Thanks for sharing the insider info, I’ve always wondered how these “rooms” all come together. Looks like lots of work, but lots of fun! You guys did a great job.
    Abby
  23. I love them all!! So funny, I have this month’s issue of Real Living and I was ogling the gorgeous kids’ rooms, then I came across your blog today and here they are! They do look real and the lighting is fab, it really looks like there’s daylight poring in from an unseen window :-)