Posts in Old Posts
9 things I learnt while renovating last time and need to remember
reno remember.jpg

While looking for an image from my old house the other day, I came across the online version of my

house feature

in Real Living a couple of years ago. Along with the usual story, I had submitted some

renovating tips

I learnt which was cut a fair bit due to space restrictions. I read them, totally forgetting what I had written and realised that they were actually helpful. Especially to someone who is about to renovate (the bathroom is happening in less than TWO WEEKS! WHOO HOO). So I managed to help... me. But I thought these tips might be useful for you too, so I'm sharing the whole lot here. Already, it's made me redesign a few things, make some additions and a fair few subtractions. So without further ado, my top 9 reno tips. Please note these images and renovation details are about my old house, not the one we recently bought - we're totally slow coaches at the moment on starting (and most definitely finishing) things. It'll come.

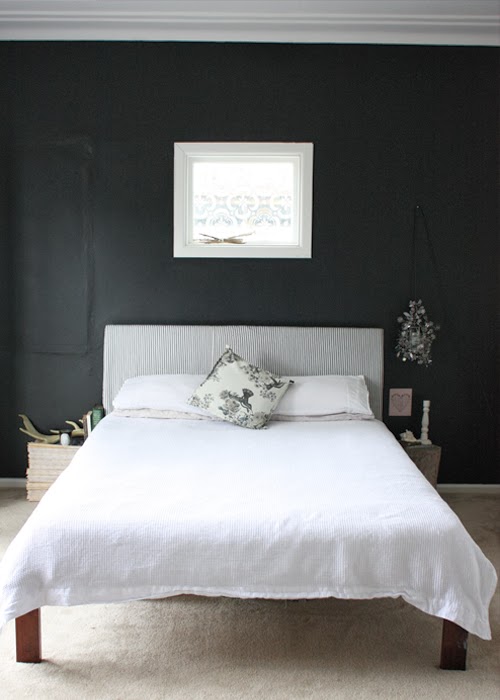
The small window in the centre of this wall in our bedroom was salvaged from a crummy tool shed tacked onto the back of our cabin in the backyard. I painted a stencil on it for a little more privacy.

1. Reuse what you have

Not just for green reasons, but budget ones too. Rather than splash out on completely new, can anything be reused/revamped/moved etc? When renovating – especially to a budget – it pays to work with what you have and improve it rather than change it completely to be something entirely different. There must have been something about the building you bought that drew you to it – so work out what it is and emphasise that or use it as your starting point to improve the rest of the space. Rather than throw them away and replace with all-new aluminium, we moved the old-style awning windows around in our house – we now have a mix of old and new, but it works. It allows the home to retain some character. Instead of laying a brand new floor to get the blonde-wood look, we adapted our plan and painted them and loved it so much, we kept it.

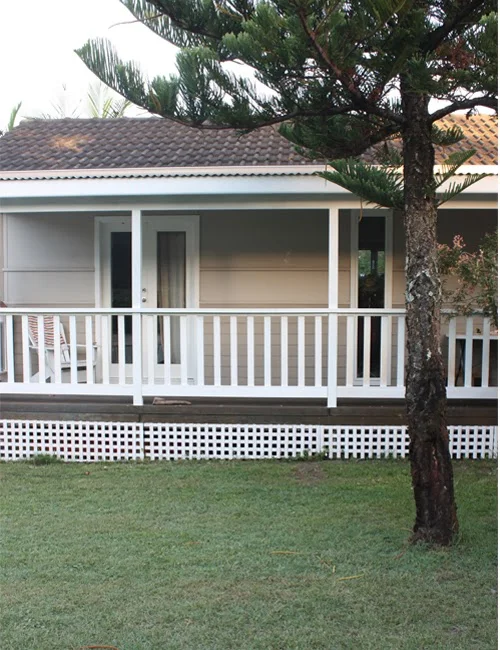
When first you don't succeed, try, try again! Our deck was built as an L-shape with a small covered porch and poky steps. Then we opened the stairs up to fit the entire width of the front doors. Then we finally covered the whole thing (and sold the house a couple of months later!)

2. Realise you might not get something right the first time/practice makes perfect

Despite living in our home for years before making major changes, we still managed to get things wrong.

- We couldn't work out what we wanted to do with the “downstairs room” (which was actually an old garage the previous owners had very badly converted to a room. They carpeted, didn’t line the walls and just shoved in a too-small glass sliding door. We originally created a large platform to make it a “sunken” living room, then created a little stairway and banister and finally decided it’d work better as two small bedrooms for the kids. 

- We also did the L-shaped deck with a small cover over the front doors, then expanded the stairs and finally put a cover on the whole thing. 

- A year or so after installing French doors in our bedroom onto the deck, we realised they’d become waterlogged and were not in fact exterior French doors and had to replace them. Need to be more specific when dealing with those you order from! You can’t always expect them to ask the right questions!

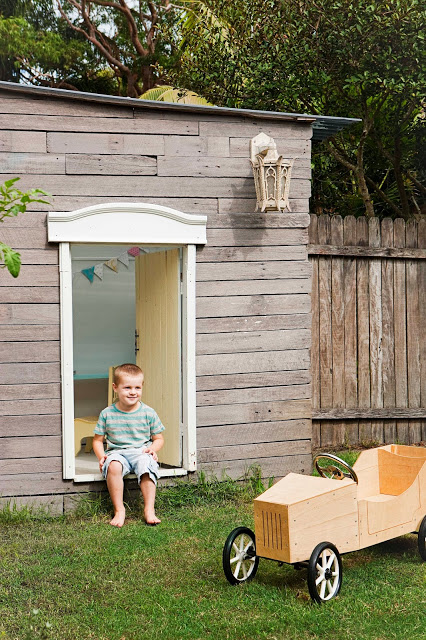
 Steve and I built this cubby house for the kids out of recycled materials. You can read about it

here

.

3. You CAN do things yourself. And it’s worth giving it a go

It’s tempting to pay someone to do the painting or floor sanding, but if you’re willing to get a little dirty and try it yourself, it’s not only worth it in the monetary sense, you get a huge satisfaction out of having that physical input into your home’s revamp. I debated paying someone $200 to tile our kitchen splashback, but really wanted to give it a go myself so I did. Steve cut out the tricky tiles for me and I did the rest – if we did a dodgy job, then we’d just get the tiler to fix it, but it turned out great! Steve and I have painted the house inside and out, project managed works, sanded and painted the floor, tiled the splashback, painstakingly planted new grass seed and built a cubby house. We’ve revamped furniture, helped move and install windows and filled hole after hole in old, cracking gyprock walls to get them smooth enough to paint over. It’s been a LONG process, but we don’t regret anything and now have a whole bunch of new skills we can take with us when we move.

We found our carpenter via our local hardware store. He did the bathroom and went on to do every major work in our house - except install the actual kitchen. My dad and I did that! 

4. Find people you trust and who were recommended to you

We didn’t know where to start to find a decent tradesperson to do our bathroom – our first major work that was contracted out. So we asked the local hardware for recommendations – they deal with tradespeople on a daily basis and know the nice ones from the not-so-nice ones. We called a few and after getting some quotes and chatting about what we wanted with our bathroom, we found our carpenter who we’ve used for every job since. It’s also a chain reaction – they work with people they recommend so you will likely find a great tiler/electrician/plumber/plasterer via that one contact.

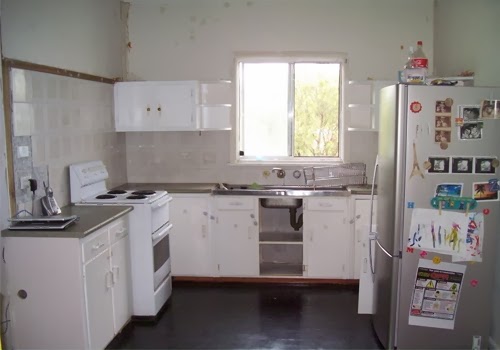
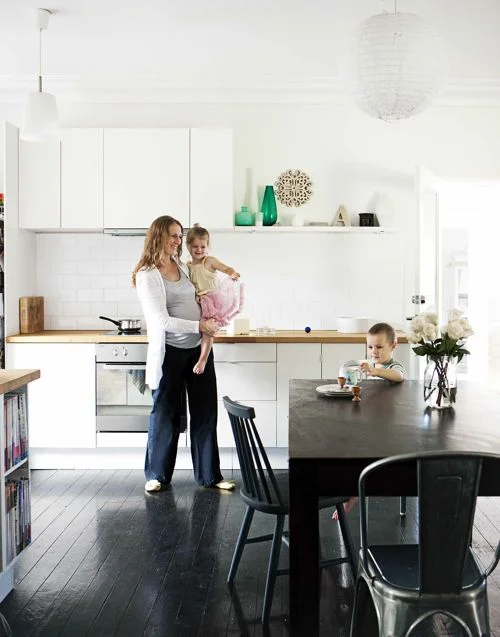
I lived with this kitchen for SIX years before we renovated it. I had to paint the green cabinets after a few months, but the lovely tiles with fruit randomly on them (WHAT is with the ugly tiles. Who thought fruit on a tile would be a good idea? Ugh) The door fell off just before we renovated - well, if six months is "just before"... 

5. You need to be patient – in terms of time and money

When we first moved in, we went crazy ripping down wall paneling and wallpaper, tearing up carpet, scraping off the ceiling spray and making the space liveable. Then we returned to work and thanks to the long commute (I was travelling 1.5 hours each way per day) and lack of energy, we ran out of steam in terms of renovating. By the time the weekend rolled around, we were exhausted, and would relax by soaking up the waterfront lifestyle we moved here for rather than working on the house. We put up with the half-painted walls, roughly sanded floors and major annoyances for a good few years before properly getting into it. And we vowed to only do major works when we had saved the money – we never took out a loan for anything we did on our house. If we couldn’t afford it, we waited until we could. It meant we were careful about what we really wanted and also ensured we didn’t get into crazy debt. It also meant it took seven years to complete our house, but while breaking up the jobs might be slightly painful, it’s exciting to see everything come together bit by bit.

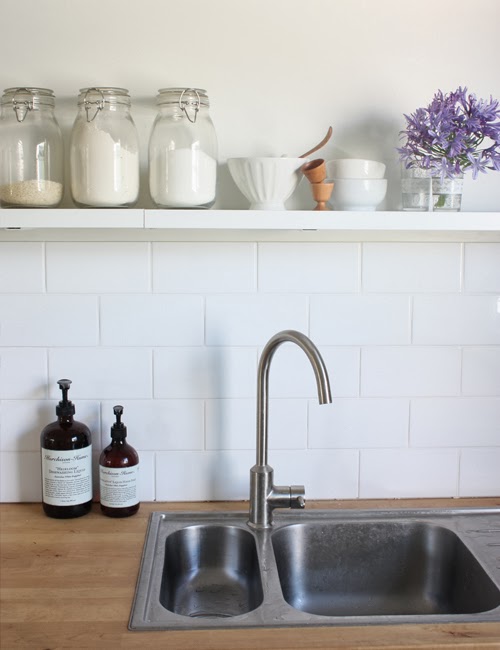
We chose Ikea for the kitchen and I bought the subway tiles from Bunnings (58c each! - I just grabbed a bunch of boxes today for our upcoming bathroom renovation) and tiled the splashback myself.

6. You don’t have to pay top dollar for everything

A lot of kitchen places use the same materials in their cabinetry as IKEA and Bunnings, so why not go with the cheaper versions rather than a custom-made space? The ranges are so huge now, there is scope to mix and match and adapt to make it suit your style and personalize it anyway – you don’t need to fork out ridiculous amounts for the same thing. We installed an Ikea kitchen and laundry (we actually installed a kitchen as our laundry!), our bathroom was practically all from Bunnings and a lot of our furniture is from chain stores like Freedom, Domayne, Fantastic Furniture and Ikea. We’re not afraid to customize new (and old) furniture with paint, wallpaper or fabric to give it a unique look. 

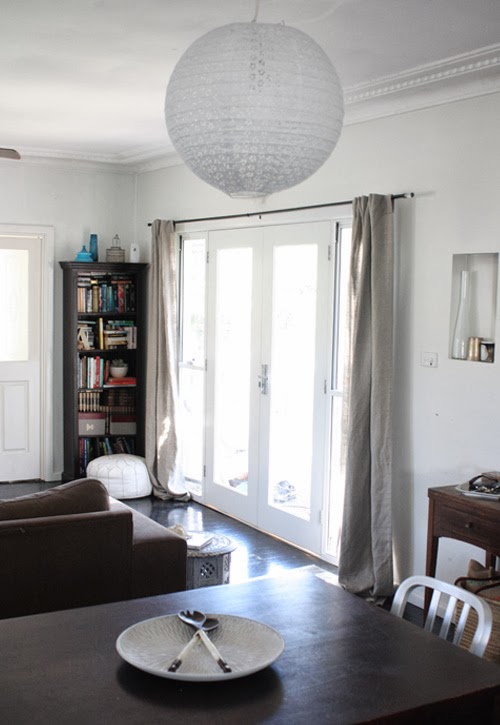
 It was never the slickest home, but we never wanted it to be. We don't strive for perfection. Our home featured things we wanted (the cut-out display shelves/French doors) and was casual and reflected us (paper lampshade, too-long, wrinkly curtains...)

7. Make sure your home looks and feels like you

You can be brave and bold if you like with colour, furniture and fittings, but will you love it forever? I’m a big lover of neutrals, black, white, grey and natural wood so you’ll find most of my home is just that. There’s not a lot of colour because I’m not very good with it. So there is no colourful or crazy statements in my home. But that didn’t stop us from adding features – like the cut-out display shelves in the living room or the black feature wall in the bedroom - we just made sure it was neutral enough to be loved by a future potential buyer and us at the same time. Same with the renovations we undertook – we wanted to turn the house into a cosy, liveable home that wasn’t too precious. We knew what we wanted – French doors onto a deck, lots of white and light and plenty of space for kids to be kids – so that’s what we set out to achieve. We could have made it trendier or more modern or something much slicker, but it’s not what we wanted – because that’s not who we are. You really need to live in a space fro a while to work out what you want from it – what you want to keep, what you want to change, what you want to improve. Regardless of DIYing it all the way or seeking out an architect, it’s invaluable to play around with floorplans and write up wish lists of features/items etc in a space. You need to know it back to front and get the right person to put your wants and wishes into place. Which leads me to next point…

We managed to fit a shower/bath, toilet and vanity into our tiny bathroom thanks to some clever door dieting by our carpenter who was happy to work with us to achieve the result we wanted.

8. Don’t be a pushover

When getting quotes for our bathroom renovation, I had builders tell me flat out there was no way I could do what I wanted to do in such a small space (place the door in the middle with the toilet on one side and the vanity on the other). Some of them didn’t even measure the space to find out if it really was impossible. In the end we went with the guy who suggested we make the doorway smaller and was happy to work with us and our ideas, rather than dismiss them. And he ended up getting every carpentry job. Then I had a tiler try to talk me out of doing the mosaic feature between the vanity and mirror because it was “a difficult job”. Don’t take the first no as gospel – a lot of tradespeople are looking for a quick job and aren’t willing to do the little extras. So find someone who will. Or who will at least take your ideas into consideration and work WITH you to achieve the best possible outcome. You’ll know when something really can’t be done, but don’t just accept it the first time – the tradesperon should try all they can to do what YOU want, not what they want.

 This covered outdoor area with built-in storage seats (genius) and brand new cabin which housed a playroom/craft room/guest room with laundry and powder room was our biggest expense, but probably got the most use. It made the biggest difference to our home and was worth every penny.

 The inside of the cabin, cause it's a prettier pic :)

9. The amount you spend on a project should reflect how much you use it

Ours worked out to this rule – the biggest bill was also the biggest change to our house. We spent a fair bit of money rebuilding the cabin, decking and covering the back. But it’s made the biggest improvement to our home – we can now use and enjoy our backyard, we’ve got an extra room and an extra bathroom. The kids have somewhere they can play – rain, hail or shine – every single day and it is an asset to our home to have that space. Same with the front deck and creating the kids rooms – for the same money for either project, we could have installed bifold doors in our living room onto the deck. But they would rarely be open and the bugs would have annoyed us. The price should reflect what you’ll get out of it.

So there. Common sense, a lot of it, I think. But sometimes you can get so caught up in trying to replicate something you saw in a magazine or agonising over tiny details that you forget the common sense. I also discovered a few renovating tips while not actually renovating. Living in someone else's space you can't change does give you time to scratch your head about things they've done that you'll vow never to do. I'll have to share those with you another time...

Got some renovating tips of your own? Please share below - I'd love to hear them! 

{All pics by me except the cubby house, via Real Living}

crafty decorating: painted cork-tile pinboard
pinboard.jpg

My poor desk has been sitting there covered in papers and bills (ugh) for way too long. It needed something to make it look a little bit more inspirational than it did so I would actually want to sit there and work. And now, I think it does! I wasn’t going to do a moodboard and I’m still not sure if I’ll bother with the typical magazine tear-sheet moodboard – because I hate ripping up my magazines! And I have no time and patience to do the photo thing I wanted to do – maybe somewhere else another time. So for now, it was a graphic pinboard of some kind for a few pictures, cards, photos and other bits and bobs I feel like hanging/dangling/pinning on it. I was thinking of stencilling something, but then I realised I keep doodling this diamond-ish pattern so I decided to translate it in giant-scale on some cork tiles.

Oh look! More handmade touches – I made this cushion out of two napkins, the twine hanger was made with dowel and thin wire, the lamp is an Ikea Tertial spraypainted blue, the garland is another one I made from scrap papers and a half-inch circle punch. Rainbow and sticker art by Layla, dinosaurs by Zak. He is such an awesome drawer.

What I love about this simple pattern and duplicate tiles is that i can change it up – the same tiles can be rearranged to be a chevron pattern or diagonal stripe. I also left space on either side to add to the tiles if I want to later on. They’re simply stuck up with

3M Command Picture Hanging Strips* 

which are easily removable from the walls (thank goodness as I’m renting!) but also meant that if I DO rearrange, it’s as simple as pulling the tiles off, and pressing them back in as they’ll just click into place. Awesome. If you’re keen to DIY, I of course took some pics of the process. Why not make the project process even more drawn-out?! Ha! Here’s how.

You’ll need:

Cork tiles – mine are from Bunnings, $13-odd for packet of 6. They’re floor tiles so quite thick and hardy.

Painter’s tape

White paint

3M Command Picture Hanging Strips

– I used 4 small velcro-style strips per cork tile

A paintbrush

Also helpful: a ruler and pencil

Step 1:

The easiest way to do this corner angle is to measure the same distance from the corner on both sides, mark and then line up the tape to the markings. I couldn’t find a ruler – of course – so used the 3M tape itself to measure everything. As multi-functional as it is genius. Tape off your corner and then cover the whole triangle with tape if you want to (or if your 3-year-old daughter is going to be painting it and you want to ensure the paint only goes in the right areas).

Step 2:

Use your ruler – or in my case – your 3M tape! – to measure the distance you want the stripes to be. Steve said you could use maths as well but PFFT. I’m not even going to go there (not even close to my strongest subject). Tape it up and around the edges and repeat – mine ended up being (coincidentally, but very helpfully) the same size as two strips of masking tape. Repeat with all tiles the same way. The maths way is something about dividing up the lengths of each side…

Step 3:

Arrange your tiles in the pattern you desire to ensure the stripes line up well enough.- with this simple pattern you can do this diamond, diagonal stripes or chevron. Don’t you love options?! If you couldn’t be bothered to keep redoing the pattern to get it right later on, mark the tiles on the back (top-left, top-right etc).

Step 4:

Have your slave child paint the remaining cork. Then go over it yourself to redistribute the paint that all ended up on the one cork tile in huge glumps. Paint the tile in smooth strokes in the one direction. Leave to dry.

Step 5:

My favourite part about painting with tape – peeling it back to see super-straight neat non-bleeding lines. Yay!

Step 6:

Stick two 3M Command picture strips together – they click together a little like velcro.

Step 7:

Peel off the backing tape off one of the sides, stick into place on the tile. I used one in each corner for super-strength and also to ensure the tile was evenly set off the wall – it sinks a tiny bit in the middle when you press in a tack, but is not going anywhere! Stick into place on the wall and repeat with all tiles until you have your pattern. These strips are great for any kind of wall hanging you want to change up – photos in frames can easily be swapped by simply taking the frame off – leaving the strip on the wall still – and then pressing back into place. Same might go if I rearrange my pinboard (although if the tiles turn to the sides they might not fit in perfectly, but they should still stay put.)

Step 8:

Stick, pin, tape, hang, decorate!

 And one more to see it in the rest of the room… There is an Expedit to the right of the kids table. I really should take a picture of the whole space, but it’s always so messy… Even too messy to show you how messy it is, if you know what I mean. Normally I’m happy to do that, but at the moment, sheesh – the place is appalling. I had to turn down an impromptu playdate today because the place looked like a bunch of teenagers had been allowed to live in it parent-free for a week. That bad.

Anyway, there is my new pinboard. I just need some things to pin on it now! It’s a bit sparse, but it was mainly to show the pattern. I kind of don’t want to cover it up too much… I like diamonds. Real ones too! x

* I was sent a packet of 3M hooks to use in some way and enter into a

Blog Aloud

competition. I think if you read my blog regularly you’ll know how I feel about them (I love and use them for EVERYTHING) so I decided against a review and incorporated the competition requirements – image, link and mention – into this project instead. My project has been shortlisted as one of the top 8 and it’s now down to votes. If you have a spare minute and enjoyed this project, please pop by to Facebook and “like” my project

here

(I am assuming a like is a vote?!?!) to vote. I would very much like to win the prize. 

Thanks!

{Images by Belinda Graham for The Happy Home}

imogen's nursery corner
immynursery18.jpg
immyprint

This print was a gift from sweet Amanda of 

Calico & Co

 and 

Lemon Tree Lane

. I couldn’t see it as an option in her store, but it should be! I’m sure she’ll be happy to chat to you if you want one too (she’s nice like that).

Imogen actually slept today so I was able to tidy up her “room” and take some pictures. Of course, it also meant she slept TOO much and I had to take the snaps with her in the bed before I lost the light… Typical! Her room is actually a teeny portion of my bedroom – it’s one half of a wall. I like my babies to sleep nearby for the first six months or so and in a little cradle – they look so ridiculously lost in a proper cot!!

moodboard2

This was my original 

moodboard

 for her nursery when she was Bubble. We didn’t know her sex and even though I wasn’t planning to decorate a full nursery, I of course did a moodboard. It’s not exactly what I’d planned, but in my world, that would be rare anyway!

bubbleroom5

So, I started with the room looking like this (above) – 

grey and white

. I still love it looking all minimal and simple, but then I went and had a little girl and there is NO ESCAPING THE PINK. So mainly due to the fact her clothes and gifts were pink, it became pink and grey with a little peach dotted throughout in the clothes and sling on the side of the cradle. And so… here it is (I may have gone overboard with the number of images. Sorry)

immynursery9

This is the “nursery” in its entirety. Not much to it, is there?! I like all the colours together and the hits of nature.

immynursery18

I painted the cradle a deep grey. It’s my own custom mix – chalkboard paint mixed with white undercoat! I love the matte chalky finish and went crazy with the same colour throughout the house – Layla’s bedhead, the step stool, a chair…

immyroom1

I used another piece of driftwood as a mini shelf – it’s stuck on the wall with a million 3M tapes (and the cradle is out from the wall so no chance of anything falling on Miss Imogen even if it does fall). The little horse is by Kate Finn and the teeny tiny ballet shoes were Layla’s – they’re from 

Chateau de Sable

.

immynursery11

I love this little clock (hmm, still need to set it!). It’s 

Decoylab

 and I struggled choosing which style I wanted, but the owl won. From 

Hunt & Gather

. BUT, I just noticed the Decoylab website is having a giveaway of THIS VERY CLOCK! Chances of that?! You’ve got till April 30 to enter – 

click here

. The tissue paper garland is made by me – I’ll have a tutorial for you tomorrow.

immynursery8

The white cube shelves are from Kmart. They cost a while $19 each. The sheepskin rug is Ludde from Ikea.

immynursery2

Love this reversible sling, only none of my children actually liked being in it. Sigh. So it’s always been a room decoration until they’re old enough for the hip-slinger style. It’s by 

Rockin’ Baby

. The giraffe is S

ophie The Giraffe

 teether.

immynursery5

I’ve used my mum’s rocking chair for all three kids. It’s fun to rock with them and I would feed in it at night but I’m way too lazy and prefer to slouch or lie in my bed.

immynursery6

I bought this little elephant while pregnant with Zak. Coles – of all places – had a bunch of really cute stuffed animals so I bought a few of them. Ooh-Ahh (Zak’s monkey) and Lion (Layla’s lion – original name) are their best mates and they nominated Elephant for Immy. I’ve since banned stuffed toys as gifts because I despise them en masse, but I’m still happy with this original buy – every child needs one fave cuddly bedtime pal… The cushion is actually a tea towel – another sweet gift from Julie of from 

Olive & Joy

. But I love the pattern and colour too much to ruin it as I do all my tea towels, so I turned it into a cushion. Keep an eye on the store as you’ll soon be able to buy a cushion in this print.

immynursery16

My driftwood hanger – wow, the last image of this (the grey and white one, above) got around the WWW, which was nice. I do love this.

immynursery13

Immy’s little shoes (the slippers are 

Britt Design

)

immynursery14

Mr Rabbit is from Typo (man, I love that store!) and the little paper boat I made – originally I was going to do a string of little multi-coloured paper boats to hang on the wall, but then I had a little girl, so the boats went to Zak and Layla to sail in the puddles and I just kept the one.

immyclothes

Teeny tiny clothes, a basket of wraps and a stack of spew catchers (ok, they’re nappies, but Immy is such a spewer, that’s what I call them) make up the rest of the cubes. And no, they’re NEVER this neat.

So there we have it – Immy’s little nursery corner/wall. Thoughts? One of the comments in my survey was a suggestion to have a before and after of the styling of a space. I thought it was a great idea. So tomorrow – provided I get the time! – I’ll show you how I put the room together, how it looked before I made it photo-worthy and a few other sneaky things I did to get it to this stage. Because despite my slight rant in my previous post, I do edit and style when I take a picture of a space. Just not as much as magazines do!

immynursery3

Sleeping beauty…

{Images by Belinda Graham for The Happy Home}

my home + family in Real Living magazine (complete with bad hair and dirty table)
rlkitchen1.jpg

Too often I will roll my eyes at the images in a homes magazine – the pictures are styled to death, you just know the stylist bought in half the furniture and accessories, and a lot of the time they even had clothes borrowed and hair and make-up expertly applied. I know all of this and it bugs me. Just like those darn photoshopped celebrities. And yet… when 

Real Living

 editor Deb basically forced me to have my home shot for the mag’s renovation special (”We’ve been waiting for you for YEARS. It must be finished now!” ), I couldn’t help but hope Sarah, the stylist, would wave her magic stylist’s wand and make the house, the styling, the family… better. I 

wanted 

clothes brought in (being a week out from my due date, I didn’t exactly have a lot to choose from). I hoped she’d bring a truckload of goodies to sprinkle through my house to make it seem a little more special. I looked forward to her whisking around my home moving this here and that there to make it look more magazine-worthy. And I was disappointed budget restraints years ago had culled hair and make-up funding – I was on my own.

Belinda's house - page 3

So when she arrived with a bag of cushions and throws in one arm and bunch of flowers in the other and declared that’s all she had, I was slightly disappointed. And when my hair refused to dry into its usual nice waves and frizzed in the heat, I was sad my “at home with” pictures were not going to rival Gwyneth’s 

House & Garden

 ones. So after they left, I worried: would it be good enough to get a run? (hey, it’s happened!) Would it look a little amateur next to architect’s and stylist’s and awesomely stylish people’s homes? Would I just look like a big fat scruffy blob? But then I slapped myself silly and gave myself a stern talking to: not only was it Real Living – and a renovation-tips story at that – but I AM Real Living through and through.

Ever since I worked on the launch issue, I was pretty much considered the official representative of the people: I AM the Real Living reader. As the deputy editor, if the price was too high, the style too unattainable, the piece too designery, the copy too technical, the project too unrealistic, it was my job to do my best to make it more “real” and have a whine about making sure it didn’t happen again. So if my home suddenly looked all perfection and too different to how it appears on my blog, if I looked like I had my shit enough together to blowdry my hair and have perfect angel children eating an impressive homecooked meal or sitting soldier-style at the table, I’d be a hypocrite.

Because I barely had enough time to make the beds, straighten the house and dress the kids and myself before they arrived. And the reason there is no impressive meal on the table is because there was no food in the house (I spent the day before cleaning, not shopping). Not even eggs, hence the empty egg cups, or fruit, hence the bare fruit bowl. And the only way Layla would even consider having her photo taken was if she wore her tutu and played with the blue golf ball (which is still on the benchtop). And then there is the matter of the filthy dirty tabletop… I swear this was clean on the day. But the dark wood, light showing up the streakmarks and the fact I’m not even close to a cleaning goddess resulted in this atrociously dirty looking table that my good friend Bi – the retoucher – didn’t magically retouch away.

And so… the house images you see in Real Living this month are very much “real”. Sarah simply moved a couple of things around and added a cushion or throw here and there. I have to admit it was very hard not having the control that I do when I style and photograph my own place for the blog. I kept going to say “why not shoot this? Or pull back more? Or shoot on this angle?” but bit my tongue – they had their instructions so I had to butt out! I think the pictures could have showed a bit more of the renovation side of things, but overall I’m happy it looks like us, looks like my house and am completely chuffed to have it featured in not just any magazine, but MY magazine (I still consider myself part of the team! hehe). I’ve always said we could have made the place slicker, much more modern and a little more “user-friendly”, but that’s not us. And if your place doesn’t feel comfortable to you, what’s the point in living there?

In a small attempt to help save the publishing industry that I love so much, I won’t post the full images and scans here until it’s offsale in a month. But, I will send you to the website where you can read 

10 lessons I learnt while renovating

. I’ll go through my ridiculous amounts of supplied copy later on and share what didn’t get published in another post. And to milk the feature for all its worth, I’ll do a small behind-the-scenes post too when I get a chance.

Until then, enjoy your copy of the mag. I’m off to buy a few copies today (I haven’t even seen it in the flesh yet; just PDFs I made the office send me and sweet 

Julie

’s snaps of the feature). Might have to leave an open copy casually lying around on “open for inspection” days when the house goes on the market! hehe

{Top image Maree Homer for 

Real Living

; other image courtesy Julie of

 Olive & Joy

}